Running Coreflux on your own machine gives you a complete IoT data pipeline—MQTT broker, LoT runtime, and data routing—without external dependencies. Prefer zero setup? Start with a Cloud Trial and use the broker and Coreflux HUB from your browser.
Coreflux runs as a single binary or container. No databases, no message queues, no orchestration needed—just download and run.
Get a hosted Coreflux instance without installing anything. Request a trial on the Coreflux website, and you will receive an email with a URL (used for both the Coreflux HUB and the MQTT broker) and login credentials.
1
Request a trial
Go to coreflux.org and submit a trial request using the form on the site.
2
Check your email
When your environment is ready, Coreflux sends an email with:
Item
What you use it for
URL
Open the HUB in your browser and connect MQTT clients to the same host (broker and HUB share one address)
Credentials
Username and password for the HUB login screen and for MQTT clients
The broker may take up to 60 seconds to be fully available after you receive the email. If the HUB or MQTT connection fails immediately, wait briefly and try again.
3
Open the HUB
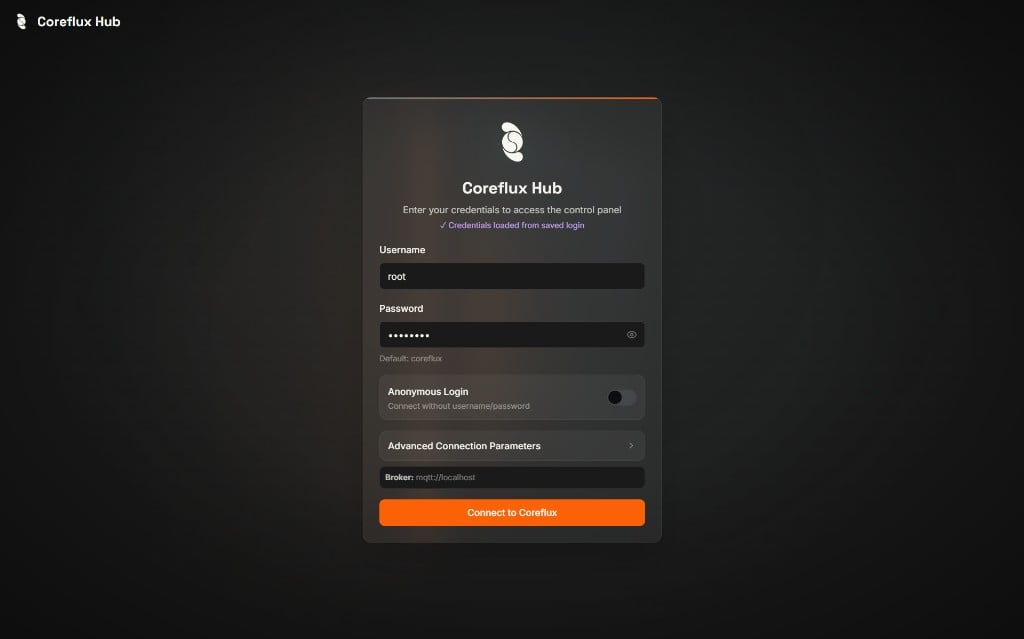
Paste the URL from the email into your browser. On the login page, enter your username and password and click Connect to Coreflux. Use the Broker field from the email if it is pre-filled differently than your trial URL.
Coreflux HUB login — enter credentials from your trial email
From the HUB you can deploy LoT Actions, browse MQTT topics in the Data Viewer, and manage Routes—same experience as a local Docker install.
4
Connect MQTT clients
Use the same host as the URL in your email (not localhost). For MQTT Explorer and other desktop clients:
Setting
Value
Protocol
MQTTS (MQTT over TLS)
Port
8883
Username / Password
From your trial email
In MQTT Explorer specifically: enable Encryption, and disable Validate certificate (the trial broker uses a certificate that desktop tools may not trust by default).
HUB remote access: If your browser blocks the HUB page, allow unsecure access (or proceed past the certificate warning) for the trial URL. Managed trial environments often use certificates that browsers flag on first visit.
After the HUB loads, continue with Getting Started using the Coreflux HUB tabs—your trial already includes the HUB and broker.
Docker is the fastest way to get Coreflux running. The official image works on Linux, macOS, and Windows. Pull the image from Docker Hub or open a terminal and run the command below—Docker will pull the latest image automatically.
The project-volume mount persists your broker project (LoT, routes, configuration) at /etc/project across container restarts. Docker creates the named volume on first run.
Deploy Coreflux in seconds with our 1-Click Droplet on DigitalOcean Marketplace. This is the fastest way to get a production-ready broker running in the cloud.
The Coreflux HUB is available in two ways: via the Docker image (browser-based, requires port mapping) or as a standalone desktop application for Windows and Linux.
Docker
Standalone Desktop App
Map the HUB ports when you start the container to access the HUB from your browser:
The project-volume mount persists your broker project (LoT, routes, configuration) at /etc/project across container restarts. Docker creates the named volume on first run.
The standalone HUB is a desktop application available for Windows x64, Linux x64, and Linux ARM64. It does not require a broker installation on the same machine.
Download the HUB executable for your platform from the Coreflux website.
Run the executable — the HUB window opens immediately.
Connect to your Coreflux broker from inside the app using the broker’s host address and credentials.
If the HUB ports are not mapped on Docker, the broker still runs normally—you simply won’t be able to open the HUB in the browser. See Coreflux HUB Overview for what you can do once it’s up.
Confirm the broker is running—either in the Coreflux HUB (no extra tools) or with an MQTT client.
Coreflux HUB
MQTT Explorer
1
Open the HUB
Open your environment URL in the browser—for a Cloud Trial, use the address from your email; for Docker, use http://localhost:8080 (or https://localhost:8443 with TLS).
2
Sign in
Enter your credentials on the login page and click Connect to Coreflux.
Coreflux HUB login page
3
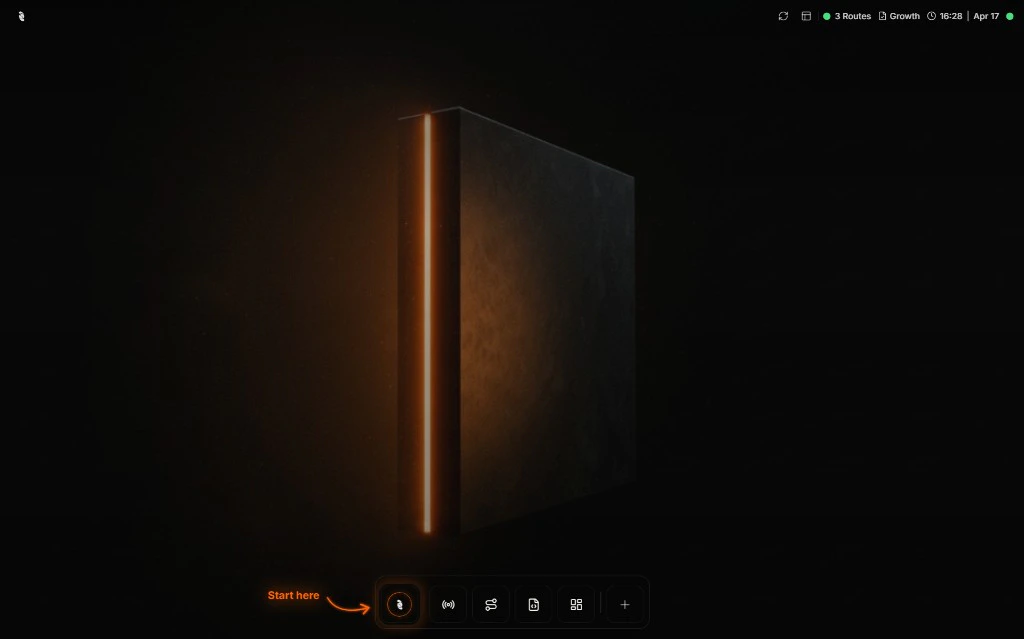
Confirm the dashboard loaded
After a successful login, you should see the HUB home screen with the bottom navigation bar.
Coreflux HUB after login — start from the first icon in the navigation bar
The status bar shows route count and license info—the broker is reachable from the HUB.
4
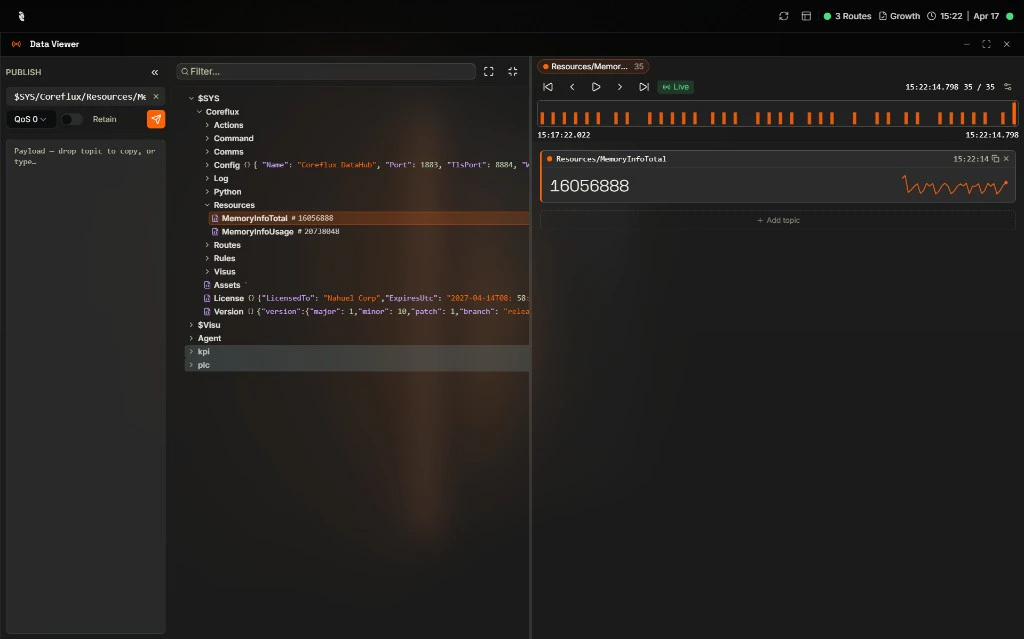
Browse MQTT data
Select MQTT → Data Viewer. Expand $SYS/Coreflux in the Topic Tree—you should see broker topics such as Config, Version, and Resources updating live.
Data Viewer — Topic Tree, Publish panel, and live topic values
1
Open MQTT Explorer
Download MQTT Explorer or use any MQTT client of your choice.
2
Connect to the Broker
Create a new connection with these settings:
Setting
Value
Host
localhost (or your trial URL host for Cloud Trial)
Port
1883 (local Docker) or 8883 with MQTTS (Cloud Trial)
Username
root (or credentials from your trial email)
Password
coreflux (or credentials from your trial email)
For Cloud Trial, use MQTTS on port 8883, enable Encryption, and disable Validate certificate in MQTT Explorer.
3
Check System Topics
Subscribe to $SYS/# to see broker status messages. If you see topics such as $SYS/Coreflux/Version, the broker is running correctly.
You should see Coreflux system topics under $SYS/Coreflux/.