You’ve installed Coreflux and deployed your first Action. Now what if you could describe your next feature in plain English and have an AI assistant write the LoT (Language of Things) code for you — correctly, using verified syntax, following best practices?That’s exactly what Coreflux’s AI integration enables. By connecting your AI assistant to the Coreflux MCP (Model Context Protocol), you give it real-time access to the official documentation. The result: you describe your goal, and the AI produces production-ready LoT code — Actions, Routes, Models, and more — without you memorizing a single keyword.
Like hiring a LoT specialist who never sleeps. You explain what your factory floor needs — “alert me when temperature spikes” — and the specialist drafts the code, wires the database, and writes the documentation.
Before using AI with Coreflux, ensure the core environment is running.
Requirement
Details
Coreflux Broker
Installed and running on your machine or server
AI Assistant
Cursor, Claude Desktop, Claude.ai, or VS Code with GitHub Copilot
MQTT Client
MQTT Explorer or any MQTT client for verifying results
1
Install the Coreflux Broker
Follow the Installation Guide for your platform (Docker, Windows, Linux, or Raspberry Pi). Verify the broker is running by connecting with MQTT Explorer.
2
Verify Your Setup
Connect to the broker and subscribe to $SYS/#. If you see system topics, the broker is ready.
Setting
Default Value
Host
localhost
Port
1883
Username
root
Password
coreflux
If you haven’t completed the Getting Started guide yet, do that first. It takes under 15 minutes and confirms your environment is working.
Coreflux uses the Model Context Protocol (MCP) to give your AI assistant real-time access to the official documentation. This means the AI doesn’t guess at LoT syntax — it looks it up. Combined with an AGENTS.md file that defines your project’s conventions, your AI assistant becomes a LoT expert that follows your team’s rules.
Add the Coreflux documentation MCP server to your AI client. Use Native to install from the contextual menu on any docs page, or Manual to add the server URL to a config file.
Native
Manual
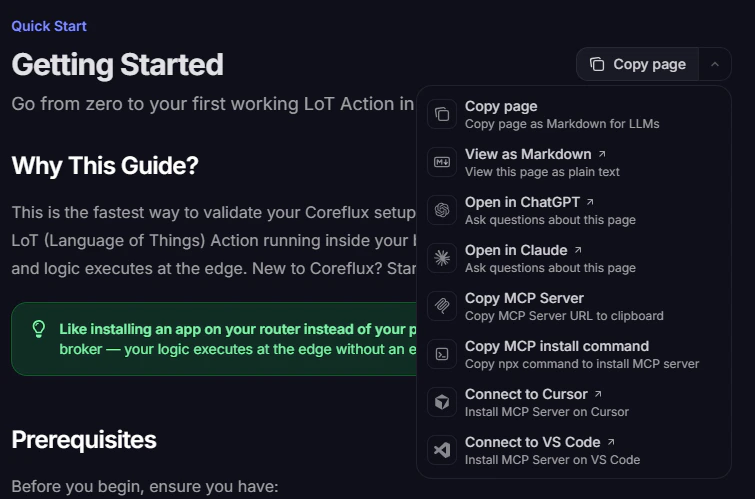
Open the Copy page menu (top right) on any Coreflux documentation page. From there you can copy the MCP URL, run the install command, or connect directly to VS Code or Cursor.
Contextual menu with MCP install options
VS Code
Cursor
Other clients
1
Connect from the menu
Select Connect to VS Code from the contextual menu.
2
Install the server
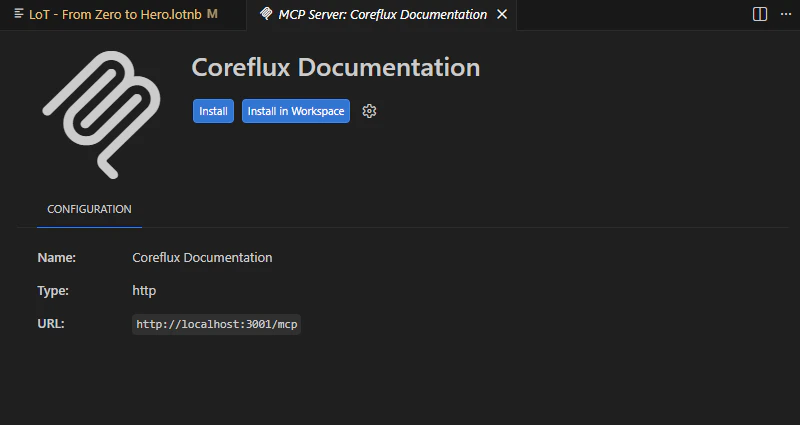
Click Install or Install in Workspace on the MCP server page.
VS Code MCP server install page
3
Enable in Copilot
Reload VS Code if needed, open Copilot Chat in Agent mode, and enable the Coreflux tools.
1
Connect from the menu
Select Connect to Cursor from the contextual menu.
2
Install the server
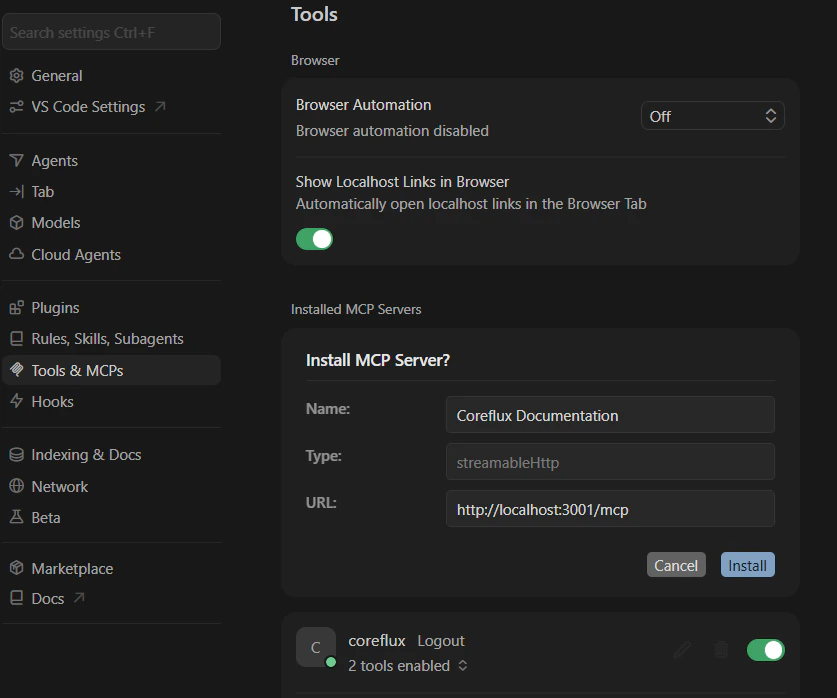
In Settings → Tools & MCPs, confirm the Install MCP Server? details and click Install.
Cursor MCP server install dialog
3
Confirm the connection
Verify Coreflux Documentation appears under Installed MCP Servers with tools enabled.
Use Copy MCP Server or Copy MCP install command from the menu, then follow the Manual tab below or the MCP Configuration Guide for Claude Desktop and other clients.
Add this URL to your editor’s MCP configuration:
https://docs.coreflux.org/mcp
VS Code
Cursor
Claude Desktop
Create or open .vscode/mcp.json in your workspace:
An AGENTS.md file in your project root tells your AI assistant how to write LoT code — naming conventions, patterns, and what to avoid. Without it, the AI may use inconsistent styles or invent syntax.Create an AGENTS.md file in your project root with your project’s conventions. The Best Practices & AGENTS.md page provides a complete starter template covering:
Naming rules — PascalCase for entities, snake_case for variables
Code standards — Type casting, state management, modular Actions
Boundaries — What the AI should always do, ask about, and never do
For a faster start, clone the Coreflux AI Starter repo — it includes ready-to-use templates and pre-built MCP configs for every editor.
Once both the MCP and AGENTS.md are configured, your AI assistant has real-time documentation access and your project’s coding standards. You’re ready to build.
With your AI assistant connected via MCP, you can use natural language to perform complex IIoT tasks. The following examples demonstrate the full workflow — from prompt to deployable code.
The most common starting point: you describe a behavior, and the AI writes the Action.The Prompt:
Create a LoT Action called TempAlert that monitors the topic
"factory/sensor/temp". If the temperature value (from a JSON payload
with key "value") goes above 50, publish an alert to "alerts/hvac"
with the current value. Use proper type casting.
AI-Generated Output:The AI consults the Coreflux MCP documentation and produces verified LoT syntax:
DEFINE ACTION TempAlertON TOPIC "factory/sensor/temp" DO SET "current_temp" WITH (GET JSON "value" IN PAYLOAD AS DOUBLE) IF {current_temp} > 50 THEN PUBLISH TOPIC "alerts/hvac" WITH "High Temperature Detected: " + {current_temp}
Why this works:
Line
What It Does
DEFINE ACTION TempAlert
Creates an Action named TempAlert (PascalCase, verb-like)
ON TOPIC "factory/sensor/temp" DO
Triggers every time a message arrives on this topic
SET "current_temp" WITH (GET JSON "value" IN PAYLOAD AS DOUBLE)
Extracts the value field from the JSON payload and casts it to a number
IF {current_temp} > 50 THEN
Conditional check against the threshold
PUBLISH TOPIC "alerts/hvac" WITH ...
Sends an alert with a descriptive message and the value
Deploy and Test:
1
Deploy the Action
Paste the code into a LoT Notebook cell (.lotnb file) and run it, or publish to $SYS/Coreflux/Command with the -addAction prefix.
A real-world scenario: you have a Siemens S7 PLC on the factory floor, and you want its data flowing into a PostgreSQL database. This requires two Routes — one to read from the PLC, and one to store in the database. Topics are the bridge between them.The Prompt:
I have a Siemens S7-1500 PLC at IP 192.168.1.10. I need to:1. Read the temperature (REAL at DB1.DBD100) and pressure (REAL at DB1.DBD104) every 500 milliseconds and publish them to MQTT topics2. Store all readings in a PostgreSQL database called "production_db" at 192.168.1.50, user "flux_user", password "secure_pass"Create the LoT Routes for both.
AI Logic:
Analyze — The AI identifies the source (Siemens S7 PLC), the data bridge (MQTT topics), and the destination (PostgreSQL)
Design — It creates two Routes: an industrial Route for the PLC, and a data storage Route for the database
Generate — Using the MCP to verify syntax, it produces:
Route 1 — Read from the PLC:
DEFINE ROUTE S7Factory WITH TYPE SIEMENS_S7
    ADD S7_CONFIG
        WITH IP "192.168.1.10"
        WITH CPU_TYPE "S71500"
        WITH RACK '0'
        WITH SLOT '1'
    ADD MAPPING SensorData
        WITH EVERY 500 MILLISECONDS
        ADD TAG Temperature
            WITH ADDRESS "DB1.DBD100"
            WITH DATA_TYPE "REAL"
            WITH SOURCE_TOPIC "plc/s7/temperature"
            WITH UNIT "°C"
            WITH DECIMAL_PLACES "2"
        ADD TAG Pressure
            WITH ADDRESS "DB1.DBD104"
            WITH DATA_TYPE "REAL"
            WITH SOURCE_TOPIC "plc/s7/pressure"
            WITH UNIT "bar"
            WITH DECIMAL_PLACES "2"
This Route reads PLC data and publishes it to MQTT topics every 500ms.Route 2 — Store in PostgreSQL:
DEFINE ROUTE ProductionDB WITH TYPE POSTGRESQL
    ADD SQL_CONFIG
        WITH SERVER "192.168.1.50"
        WITH PORT '5432'
        WITH DATABASE "production_db"
        WITH USERNAME "flux_user"
        WITH PASSWORD "secure_pass"
    ADD EVENT StoreTemperature
        WITH SOURCE_TOPIC "plc/s7/temperature"
        WITH QUERY "INSERT INTO sensor_readings (recorded_at, sensor, value) VALUES (NOW(), 'temperature', '{value}')"
    ADD EVENT StorePressure
        WITH SOURCE_TOPIC "plc/s7/pressure"
        WITH QUERY "INSERT INTO sensor_readings (recorded_at, sensor, value) VALUES (NOW(), 'pressure', '{value}')"
The AI generates a database Route that subscribes to the MQTT topics published by the PLC Route and inserts every reading into a sensor_readings table — complete with SQL templates, connection config, and event triggers, without you writing a single line of SQL manually.The Data Flow:
Step
Component
What Happens
1
S7 Route
Reads DB1.DBD100 and DB1.DBD104 from the PLC
2
MQTT Topics
Values published to plc/s7/temperature and plc/s7/pressure
3
PostgreSQL Route
Inserts each reading into the sensor_readings table
The PLC Route and PostgreSQL Route are independent — they communicate through MQTT topics. This decoupled architecture means you can add more consumers (alerts, dashboards, other databases) without modifying the PLC Route. For a step-by-step walkthrough of building a database Route from scratch, see the Developing with LoT Using AI guide.
AI excels at iterating on existing code and producing documentation alongside it.The Prompt:
Update the TempAlert action to also log every alert to "system/logs"
with a timestamp. Then generate a markdown summary documenting this
action on a project-specific LoT Notebook (LoTNB file).
AI-Updated Code:The AI modifies the existing Action and adds the logging line:
DEFINE ACTION TempAlertON TOPIC "factory/sensor/temp" DO SET "current_temp" WITH (GET JSON "value" IN PAYLOAD AS DOUBLE) IF {current_temp} > 50 THEN PUBLISH TOPIC "alerts/hvac" WITH "High Temperature Detected: " + {current_temp} SET "log_time" WITH TIMESTAMP "UTC" PUBLISH TOPIC "system/logs" WITH "TempAlert triggered at " + {log_time} + " — value: " + {current_temp}
What Changed
Why
Added SET "log_time" WITH TIMESTAMP "UTC"
Captures the current UTC timestamp into a variable
Added PUBLISH TOPIC "system/logs"
Creates an audit trail with timestamp and value
AI-Generated Documentation:The AI also produces a markdown summary you can add directly to your project’s LoT Notebook (LoTNB):
## Action: TempAlert**Description:** Monitors temperature thresholds for the HVAC system. Triggers an alert when the factory temperature sensor exceeds 50°C and logs every alert event for auditing.| Property | Value ||----------|-------|| **Trigger** | `factory/sensor/temp` || **Condition** | Temperature > 50°C |**Outputs:**| Topic | Purpose ||-------|---------|| `alerts/hvac` | Real-time alert with temperature value || `system/logs` | Timestamped audit trail of all triggered alerts |**Payload Format:** Expects JSON with a `value` key (e.g., `{"value": 62.5}`)
This is the complete cycle: build → modify → document — all driven by natural language prompts.
To get the most out of AI-assisted LoT development, keep these principles in mind:
Always verify the MCP connection before starting a session. Without it, the AI may generate plausible-looking but incorrect LoT syntax
Be specific in your prompts — include topic names, payload formats, thresholds, and hardware details. The more context you provide, the more accurate the output
Build incrementally — deploy and test one Action, Route, or Model at a time before moving to the next
If your AI assistant generates LoT code without consulting the MCP, the syntax may be invented. Always verify that the MCP tools are active before trusting the output.