The Bridge Between AI and Your Coreflux Environment
Modern AI assistants are powerful — but they don’t natively understand LoT (Language of Things) syntax, Coreflux broker configuration, or the nuances of industrial IoT architecture. Without access to the official documentation, an AI assistant will guess, often producing code that looks plausible but uses invented syntax.The Model Context Protocol (MCP) solves this. MCP is an open standard that lets AI assistants — like Claude, GitHub Copilot, or any MCP-compatible client — call external tools during a conversation. The Coreflux MCP Server exposes the entire Coreflux documentation as a set of tools your assistant can query in real time. When you ask “how do I create a time-based LoT Action?”, your assistant doesn’t guess — it looks up the answer in the official docs and responds with verified syntax and working examples.The result: you stay in your editor, describe what you want in plain English, and get accurate LoT code grounded in real documentation.
Like giving your AI assistant a library card for Coreflux. Instead of guessing about LoT syntax or broker configuration, your assistant can look it up directly in the official docs and give you an accurate, sourced answer.
MCP (Model Context Protocol) is a standard created by Anthropic that defines how AI assistants communicate with external services. It works like a plugin system: an MCP server exposes a set of tools, and an MCP client (your AI assistant) discovers and calls those tools during conversation.Here is what happens when you ask your AI assistant a Coreflux question:
Step
What Happens
1. You ask
You type a question in natural language — “Create a LoT Action that monitors temperature sensors”
2. AI recognizes the domain
Your assistant detects this is a Coreflux question and decides to consult the MCP tools
3. MCP tool call
The assistant calls the Coreflux MCP Server — searching the documentation or asking the docs assistant
4. Documentation responds
The MCP server returns relevant documentation snippets, syntax references, and code examples
5. AI synthesizes
Your assistant combines the documentation with your specific requirements to produce accurate, grounded LoT code
6. You review
You receive a response with correct syntax, proper patterns, and source references you can verify
This loop happens automatically once the MCP is connected. You don’t need to tell your assistant to “use the MCP” — it discovers the available tools and calls them whenever your question relates to Coreflux.
Component
Role
MCP Server
Coreflux’s hosted service that exposes documentation tools
MCP Client
Your AI assistant (Claude, Copilot, etc.) that calls those tools
Connect your AI assistant to the Coreflux documentation MCP server. Choose Native to install from the contextual menu on any documentation page, or Manual to paste the server URL into your editor’s configuration file.
Native
Manual
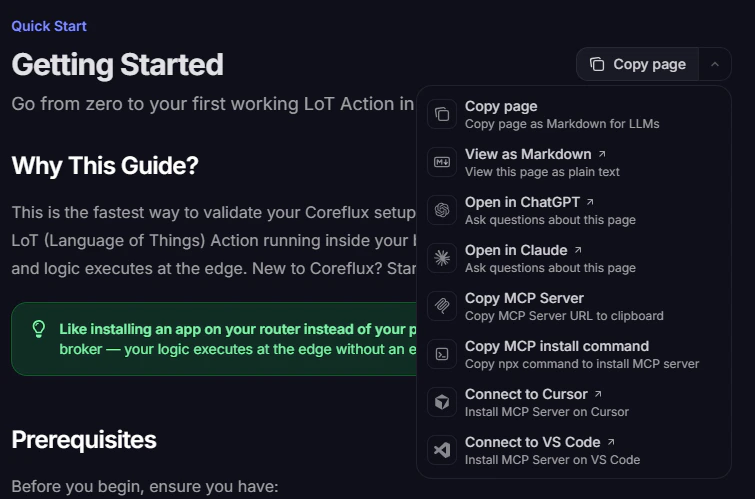
The fastest way to connect is through the contextual menu at the top of every documentation page. It copies the hosted MCP server URL or installs the server directly in supported editors — no JSON editing required.
Open the contextual menu from Copy page on any documentation page
Menu option
What it does
Copy MCP Server
Copies the hosted MCP server URL to your clipboard
Copy MCP install command
Copies the npx add-mcp command to install the server
Connect to Cursor
Opens Cursor and installs the MCP server
Connect to VS Code
Opens VS Code and installs the MCP server
VS Code
Cursor
Other clients
1
Open the contextual menu
On any Coreflux documentation page, click Copy page (top right) to expand the menu.
2
Connect to VS Code
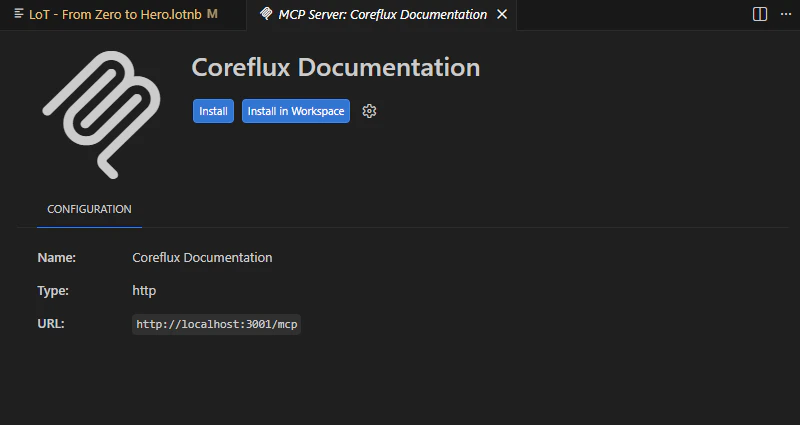
Select Connect to VS Code. VS Code opens the MCP server installation flow for Coreflux Documentation.
3
Install the server
On the MCP server page, click Install (current window) or Install in Workspace (project only). Confirm trust if prompted.
VS Code MCP server page after Connect to VS Code
4
Enable tools in Copilot
Reload the window if needed, then open Copilot Chat in Agent mode and enable the Coreflux tools in the tool picker.
1
Open the contextual menu
On any Coreflux documentation page, click Copy page (top right) to expand the menu.
2
Connect to Cursor
Select Connect to Cursor. Cursor opens the MCP server installation flow for Coreflux Documentation.
3
Install the server
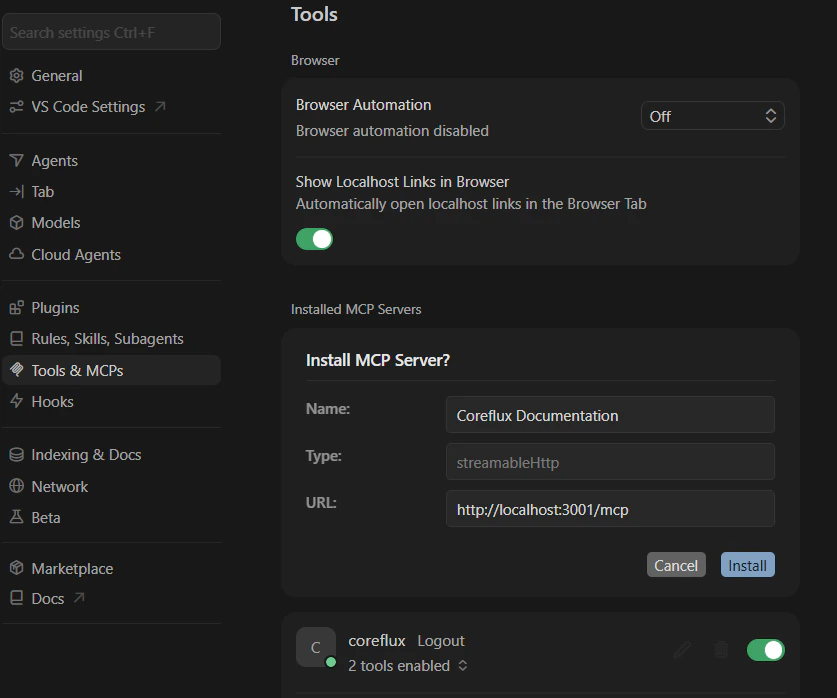
In Settings → Tools & MCPs, review the pre-filled Install MCP Server? form (name, type, and URL), then click Install.
Cursor Tools settings after Connect to Cursor
4
Confirm in Cursor
Verify Coreflux Documentation appears under Installed MCP Servers with tools enabled.
To install manually in Cursor instead, use Copy MCP Server or Copy MCP install command, then switch to the Manual tab and follow the Cursor steps.
For Claude Desktop, Claude.ai, or other MCP clients that are not in the menu:
1
Copy the server URL
Open the contextual menu and choose Copy MCP Server. Paste the URL into your client’s MCP configuration.
2
Or use the install command
Choose Copy MCP install command and run the copied npx add-mcp command in your terminal, then follow the prompts for your editor.
3
Finish setup in your client
Restart the client and confirm the Coreflux Documentation server is connected. See the Manual tab for editor-specific configuration examples.
Add the Coreflux MCP server URL to your client’s configuration file. Use this method when you need full control over the config or when the contextual menu is unavailable.Coreflux MCP Server URL:
https://docs.coreflux.org/mcp
The Coreflux AI Starter repository has pre-built MCP config files for Cursor, VS Code, and Claude Desktop — copy the file for your editor instead of writing JSON by hand.
Cursor
Claude Desktop
Claude.ai
VS Code
Cursor supports MCP servers natively. Add the Coreflux MCP to your global configuration or to a specific project.
1
Open MCP Configuration
Navigate to your Cursor MCP configuration file. You can use the global configuration at ~/.cursor/mcp.json, or create a project-level .cursor/mcp.json in your workspace root.
Restart Cursor or reload the window for the MCP server to be detected. You should see the Coreflux tools become available in your AI assistant’s tool list.
4
Verify the Connection
Open Cursor Settings and navigate to the MCP section. You should see coreflux listed as a connected server with its tools available.
If you already have other MCP servers configured, simply add the "coreflux" entry alongside them inside the existing mcpServers object.
Claude Desktop supports MCP servers through its configuration file.
Reload the window (Ctrl+Shift+P → Developer: Reload Window). The Coreflux MCP tools will become available in Copilot’s agent mode.
4
Confirm trust and enable tools
After reloading, confirm trust if prompted and open the “Configure Tools” button in the Chat input to verify the tools are enabled in the tool picker before proceeding.
5
Use in Copilot Chat
Open the Copilot Chat panel and switch to Agent mode. The Coreflux tools will be available for Copilot to call when relevant.
After setup, confirm the MCP is working by sending a test prompt to your AI assistant. The specific prompt doesn’t matter — what matters is that the assistant calls the Coreflux MCP tools rather than answering from memory.
Using the Coreflux documentation, show me the correct syntax for
a LoT Action that triggers every 30 seconds and publishes a
heartbeat message.
It’s working if your assistant calls one of the MCP tools during its response. In Cursor, you’ll see the tool calls in the assistant’s output. In Claude Desktop, look for the hammer icon indicating tool usage.
It’s not working if the assistant answers from general knowledge without calling any Coreflux tools. Double-check your MCP configuration and restart your client.
When the MCP is active, your assistant’s response will:
Reference specific LoT syntax from the documentation (not invented patterns)
Include working code examples that match the official docs
Cite source pages you can open to verify the information
Use correct terminology — LoT, Actions, Models, Rules, Routes — exactly as defined in the documentation
Without the MCP, the assistant might still produce LoT-like code, but it will be based on general training data rather than the official Coreflux documentation. Always verify the connection before starting a development session.
The more specific your question, the better the results. Instead of asking “tell me about routes,” try “how do I configure a PostgreSQL data storage route with authentication.” Specific queries help the tools return more relevant documentation.
Ask for Source References
When you need to verify information, ask your assistant to include documentation source links. The Coreflux MCP tools can return references to official pages so you can open and verify the answer yourself.
Use for Code Review
Before deploying LoT code, ask your assistant to validate the syntax against the documentation. For example: “Check the Coreflux docs — is this the correct syntax for a Modbus TCP route?” This ensures your code follows the latest documented patterns.
Leverage Conversation Context
The documentation assistant supports multi-turn conversations. Ask follow-up questions to drill deeper into a topic without repeating context — the assistant remembers what you discussed previously in the same conversation.
The Coreflux MCP Server is currently in beta. The server URL may change as the service evolves. Check this page for the latest configuration instructions.