> ## Documentation Index
> Fetch the complete documentation index at: https://docs.coreflux.org/llms.txt
> Use this file to discover all available pages before exploring further.
# How to Use a LoT Notebook
> Learn how to use LoT Notebooks to run, document and debug your LoT code.
 ## The Notebook Workflow
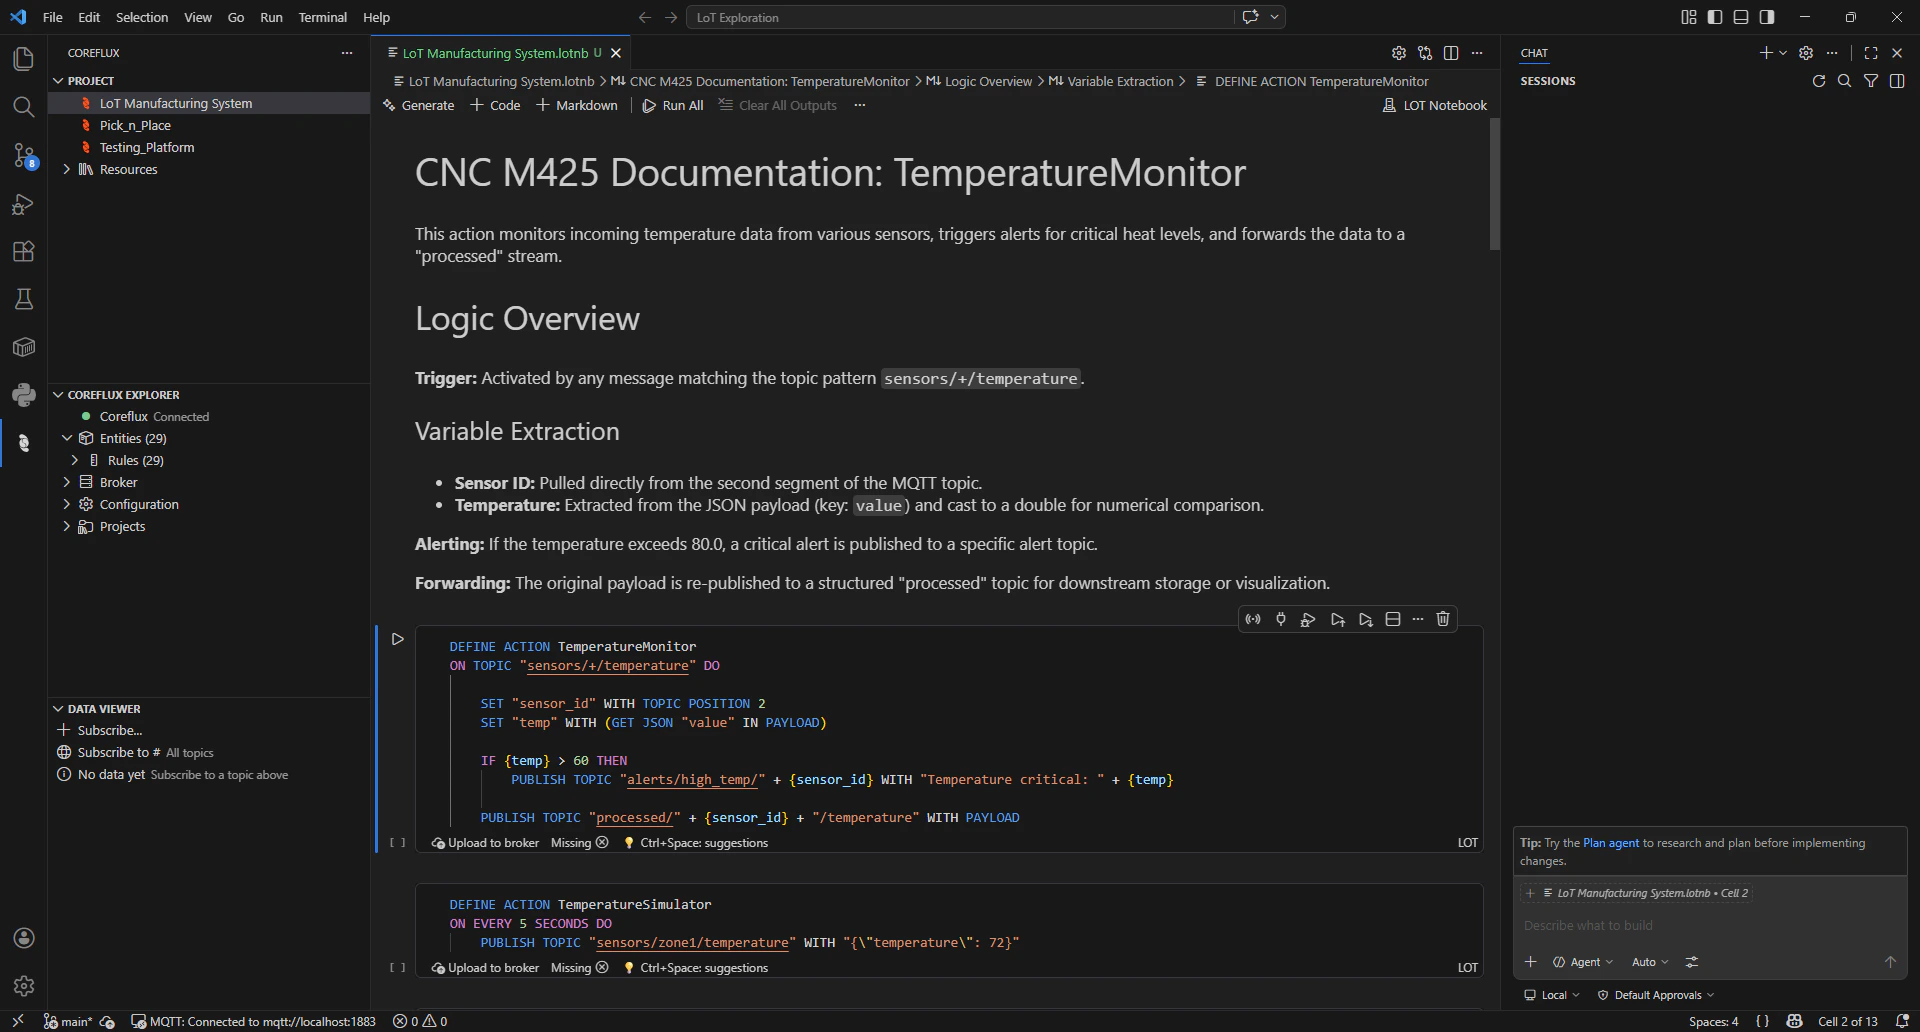
LoT Notebooks combine **Documentation in Markdown** and **LoT code** in a **single file**, so you can both run your code and keep your documentation together, using the notebook as **living documentation** for your project.
**Picture a smart kitchen:** **Markdown** is the recipe on the page, each **LoT code** cell is how you run each step of the recipe, and the **Data Viewer** shows you the results of each step.
***
## Install and connect
## The Notebook Workflow
LoT Notebooks combine **Documentation in Markdown** and **LoT code** in a **single file**, so you can both run your code and keep your documentation together, using the notebook as **living documentation** for your project.
**Picture a smart kitchen:** **Markdown** is the recipe on the page, each **LoT code** cell is how you run each step of the recipe, and the **Data Viewer** shows you the results of each step.
***
## Install and connect
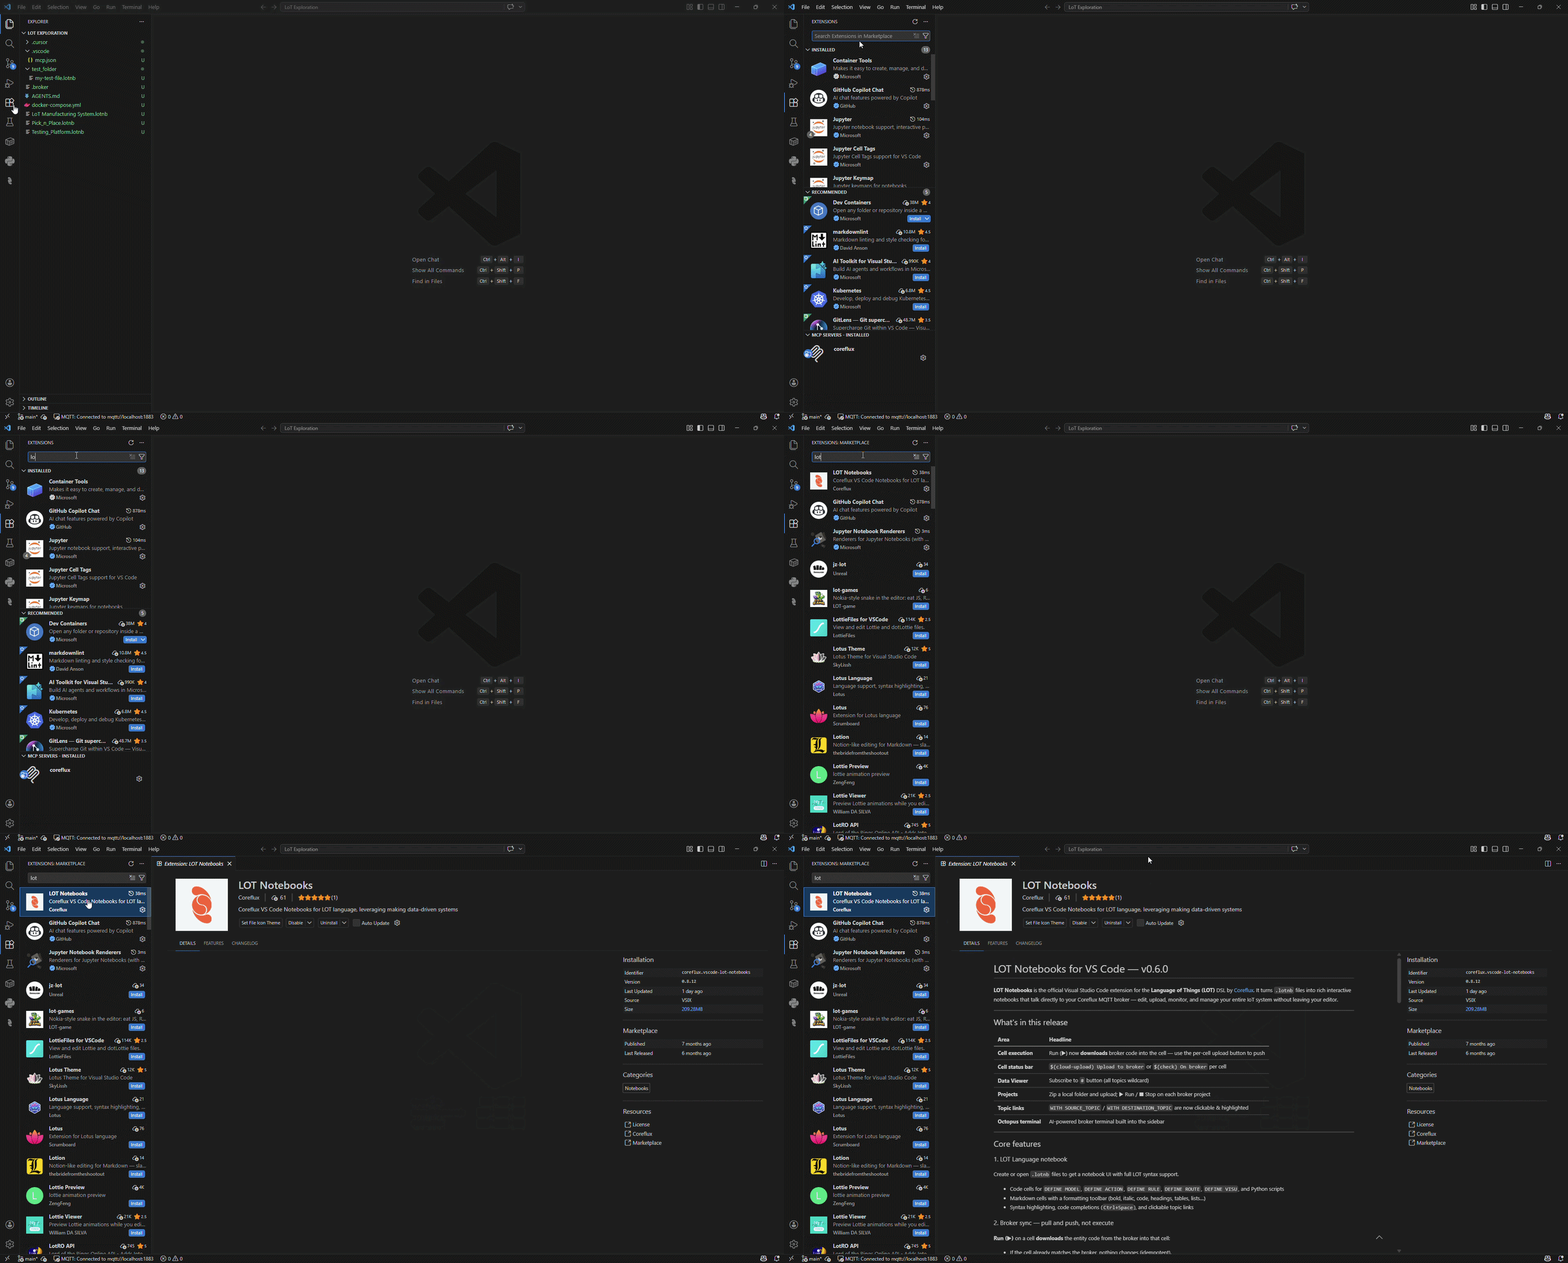 1. Open VS Code.
2. Open the Extensions view in the sidebar (or use the shortcut `Ctrl+Shift+X` on Windows/Linux, `Cmd+Shift+X` on macOS).
3. Search for **LoT Notebooks** by **Coreflux** and install it.
1. Open VS Code.
2. Open the Extensions view in the sidebar (or use the shortcut `Ctrl+Shift+X` on Windows/Linux, `Cmd+Shift+X` on macOS).
3. Search for **LoT Notebooks** by **Coreflux** and install it.
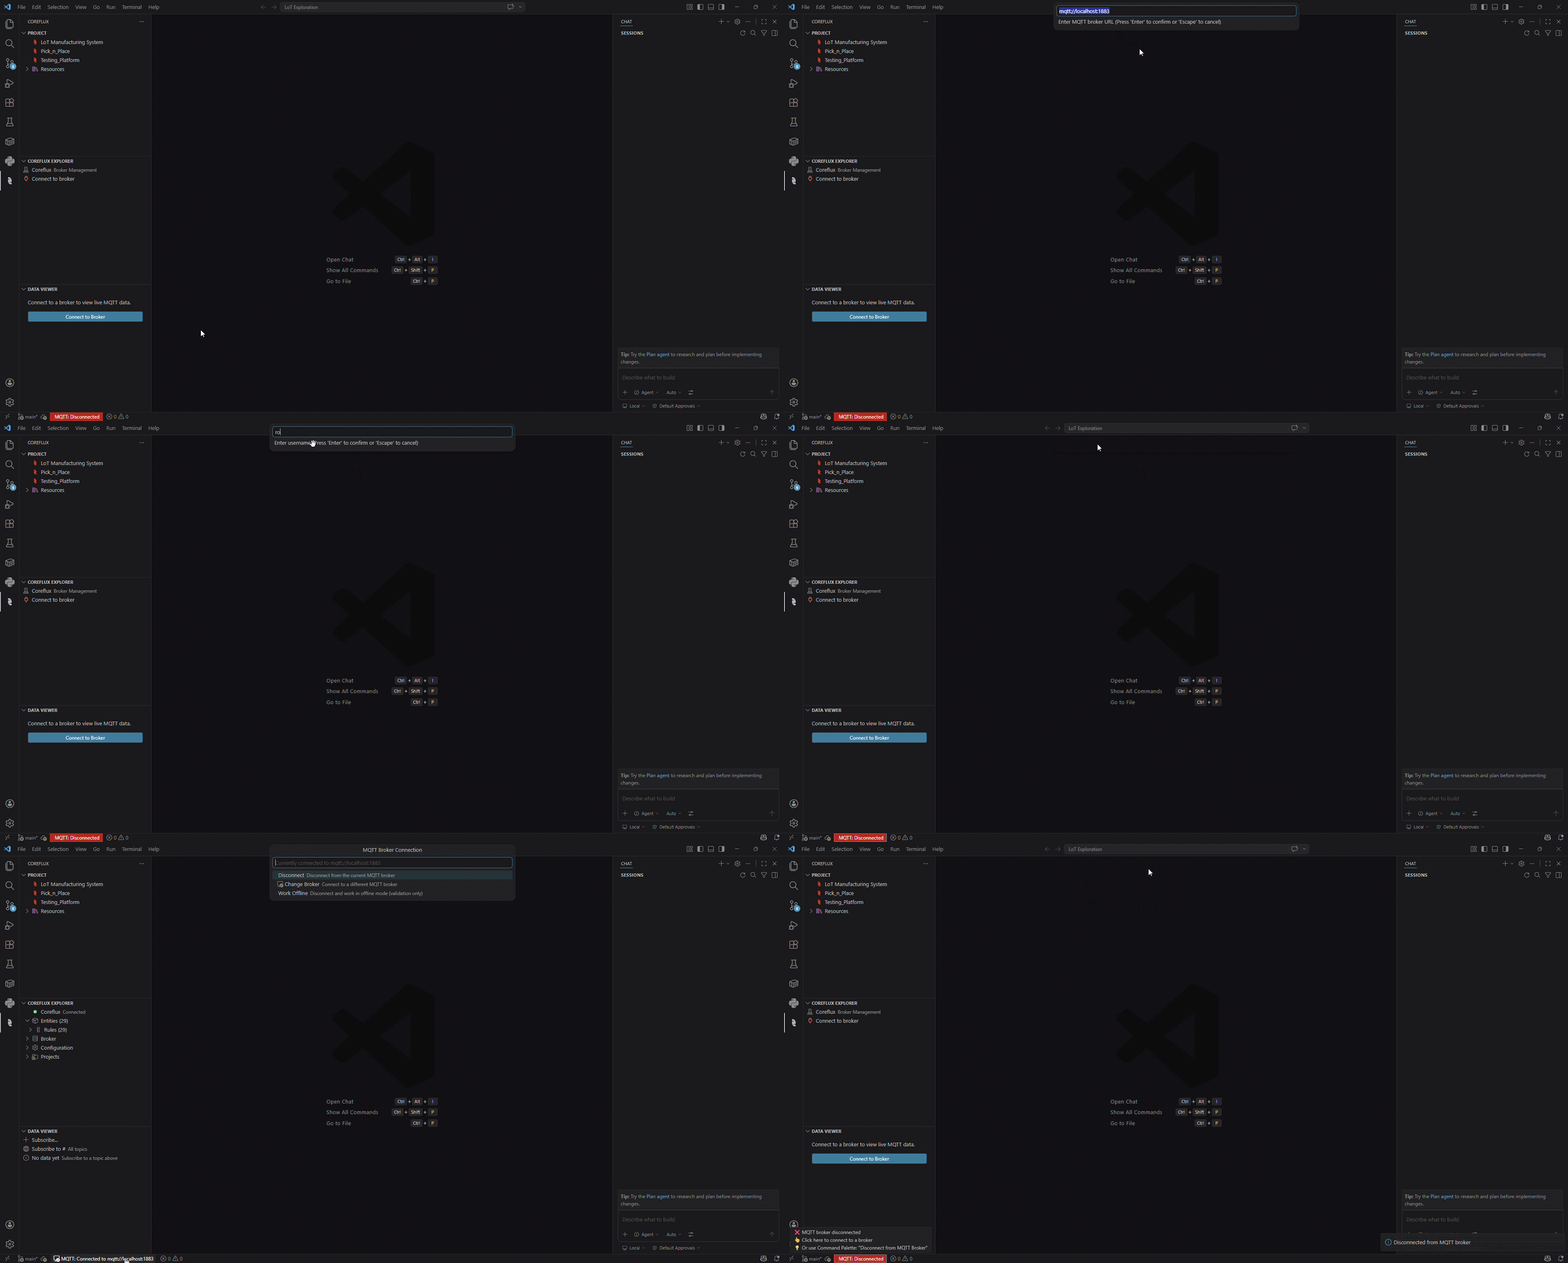 1. Click the **MQTT** connection status in the bottom-left of VS Code, or click **Connect to Broker** in the **Data Viewer** (Coreflux sidebar).
2. Enter your broker **URL**, **username**, and **password**.
Use a full URL such as `mqtt://localhost:1883` or `mqtts://your-host:8883` for TLS.
| Setting | Example (local defaults) |
| -------- | --------------------------------------------- |
| URL | `mqtt://localhost:1883` |
| Username | `root` |
| Password | `coreflux` (change immediately in production) |
When you are connected, the status bar shows a green **MQTT: Connected**. If any issues occur, the status bar will become red.
The extension securely stores your credentials. You only need to configure them once per workspace.
***
## Create a new project
1. Click the **MQTT** connection status in the bottom-left of VS Code, or click **Connect to Broker** in the **Data Viewer** (Coreflux sidebar).
2. Enter your broker **URL**, **username**, and **password**.
Use a full URL such as `mqtt://localhost:1883` or `mqtts://your-host:8883` for TLS.
| Setting | Example (local defaults) |
| -------- | --------------------------------------------- |
| URL | `mqtt://localhost:1883` |
| Username | `root` |
| Password | `coreflux` (change immediately in production) |
When you are connected, the status bar shows a green **MQTT: Connected**. If any issues occur, the status bar will become red.
The extension securely stores your credentials. You only need to configure them once per workspace.
***
## Create a new project
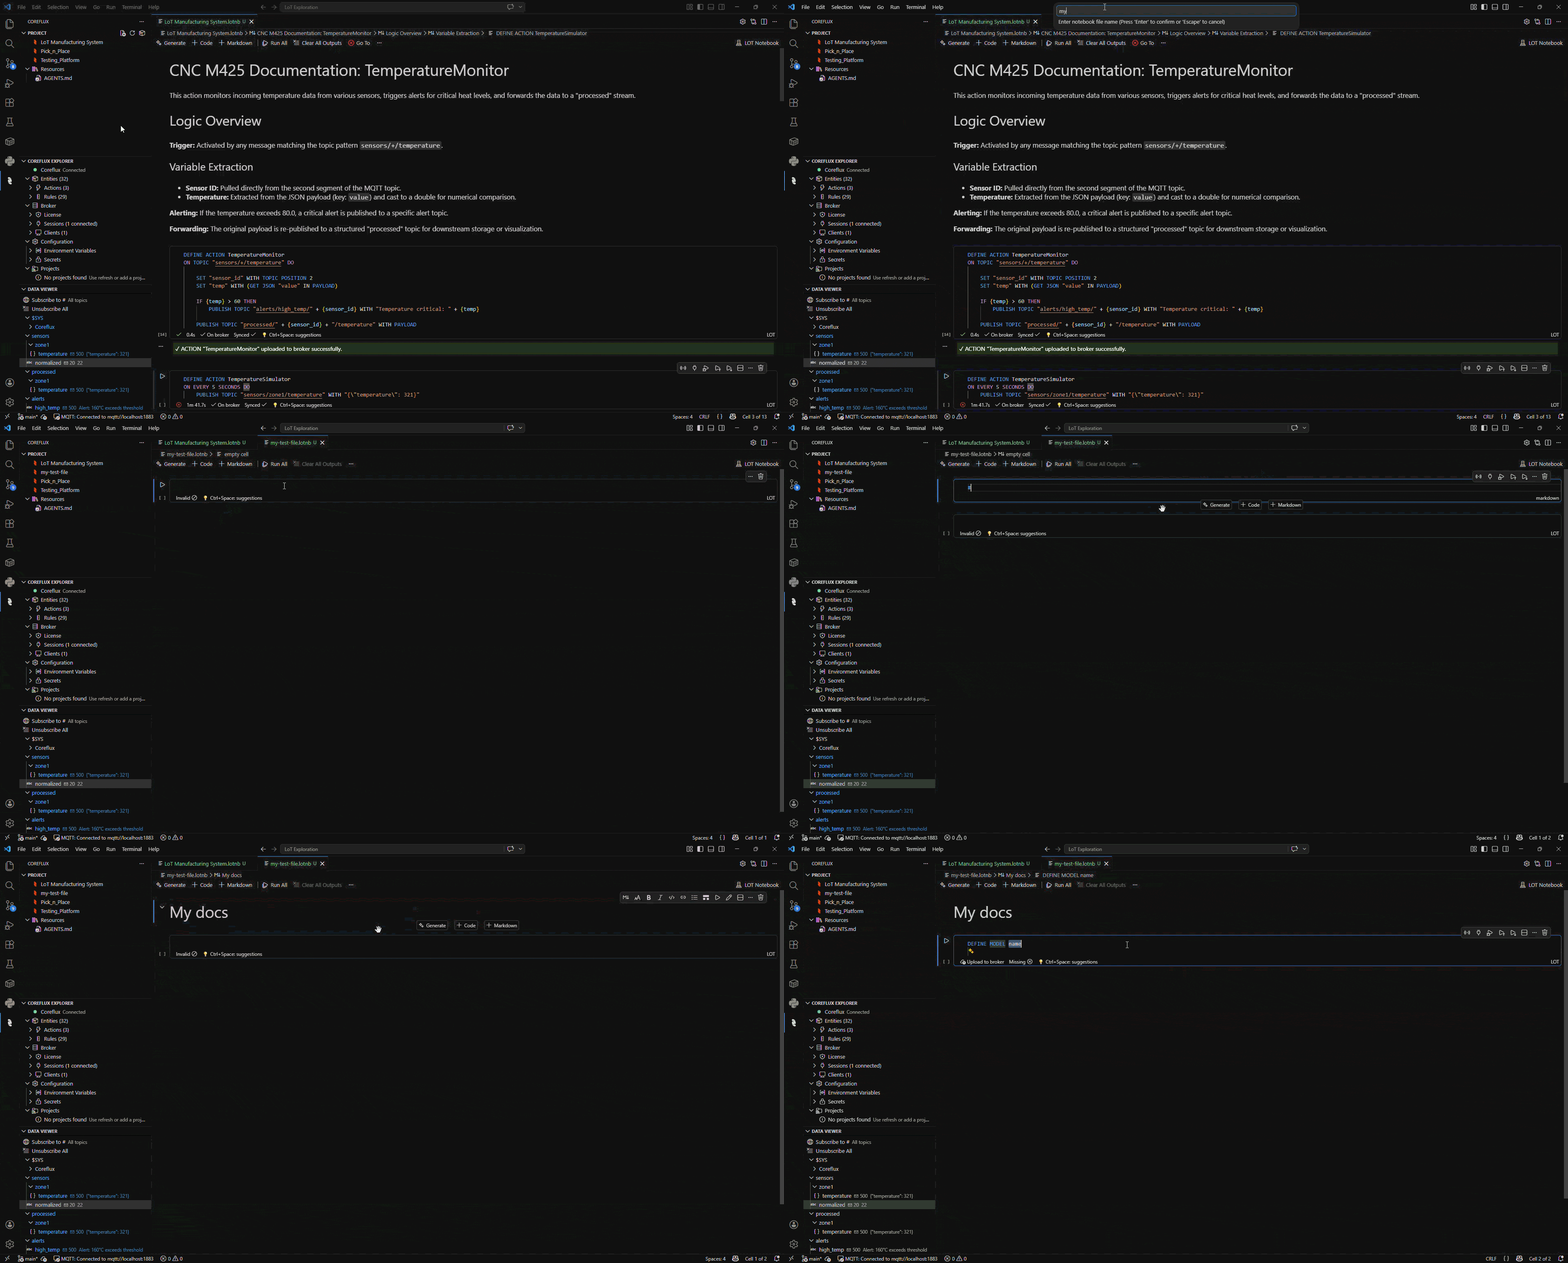 1. In the Activity Bar, open the **Coreflux** view. Under **PROJECT**, use **New File** to create a notebook and save it in your workspace (use **New Folder** first if you want a dedicated project folder).
2. In the notebook, add **Markdown** and **LoT** cells from the toolbar as needed.
***
## Add LoT code to a LoT Notebook
1. In the Activity Bar, open the **Coreflux** view. Under **PROJECT**, use **New File** to create a notebook and save it in your workspace (use **New Folder** first if you want a dedicated project folder).
2. In the notebook, add **Markdown** and **LoT** cells from the toolbar as needed.
***
## Add LoT code to a LoT Notebook
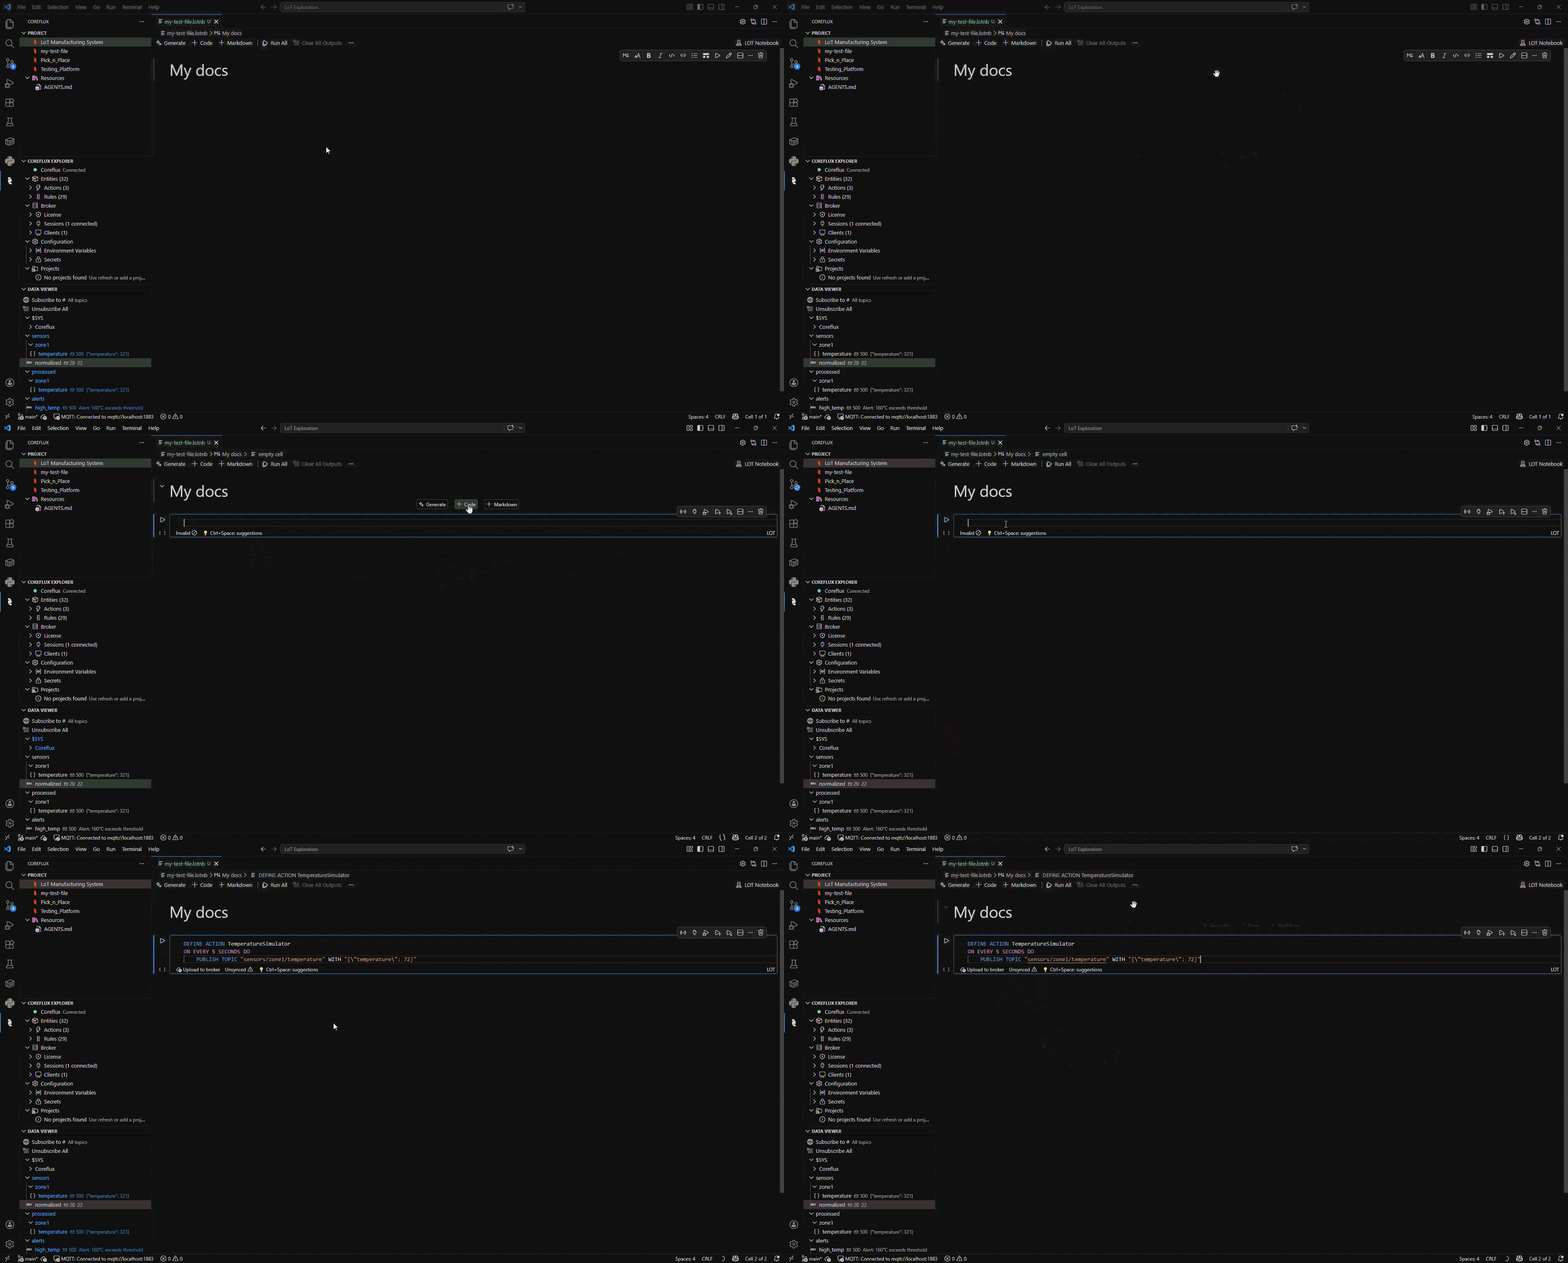 1. Open your LoT Notebook in VS Code.
2. From the notebook toolbar, add a **code** cell.
3. Type or paste your LoT code (`DEFINE ACTION`, `DEFINE MODEL`, and so on). For a first example, use the code below.
```lot wrap theme={"theme":"css-variables","languages":{"custom":["/languages/lot.json"]}}
DEFINE ACTION Heartbeat
ON EVERY 10 SECONDS DO
PUBLISH TOPIC "system/heartbeat" WITH TIMESTAMP "UTC"
```
***
## What type of cells you can add to LoT Notebooks
LoT Notebooks support three types of cells, each with different behavior:
### Markdown Cells - Documentation
1. Open your LoT Notebook in VS Code.
2. From the notebook toolbar, add a **code** cell.
3. Type or paste your LoT code (`DEFINE ACTION`, `DEFINE MODEL`, and so on). For a first example, use the code below.
```lot wrap theme={"theme":"css-variables","languages":{"custom":["/languages/lot.json"]}}
DEFINE ACTION Heartbeat
ON EVERY 10 SECONDS DO
PUBLISH TOPIC "system/heartbeat" WITH TIMESTAMP "UTC"
```
***
## What type of cells you can add to LoT Notebooks
LoT Notebooks support three types of cells, each with different behavior:
### Markdown Cells - Documentation
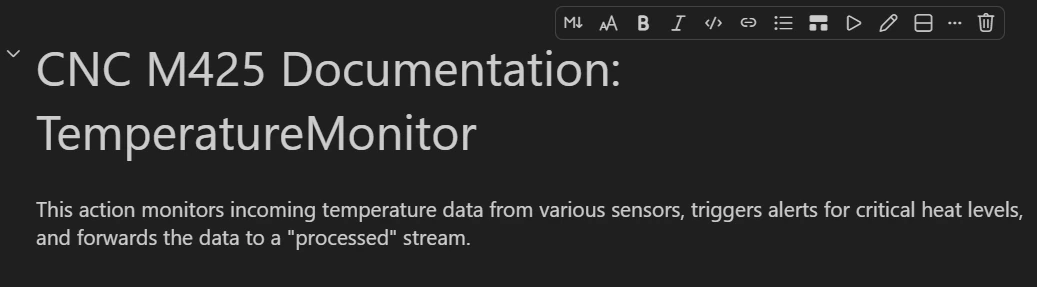 Markdown cells are for **documentation only**—they don't execute. Use them to:
* Explain what your code does and why
* Document configuration requirements
* Add diagrams, tables, and formatted text
* Create section headers and navigation
### LoT Code Cells - Runnable Logic
Markdown cells are for **documentation only**—they don't execute. Use them to:
* Explain what your code does and why
* Document configuration requirements
* Add diagrams, tables, and formatted text
* Create section headers and navigation
### LoT Code Cells - Runnable Logic
 LoT cells contain executable **LoT (Language of Things)** code. When you run a LoT cell:
1. The extension parses your code
2. Sends it to the connected broker via MQTT
3. The broker compiles and registers the definition
4. You receive confirmation or error feedback
For what LoT is, how it fits the broker, and more examples, see [Introduction to LoT](/latest/lot-language/introduction).
### Python Cells - Advanced Logic
LoT cells contain executable **LoT (Language of Things)** code. When you run a LoT cell:
1. The extension parses your code
2. Sends it to the connected broker via MQTT
3. The broker compiles and registers the definition
4. You receive confirmation or error feedback
For what LoT is, how it fits the broker, and more examples, see [Introduction to LoT](/latest/lot-language/introduction).
### Python Cells - Advanced Logic
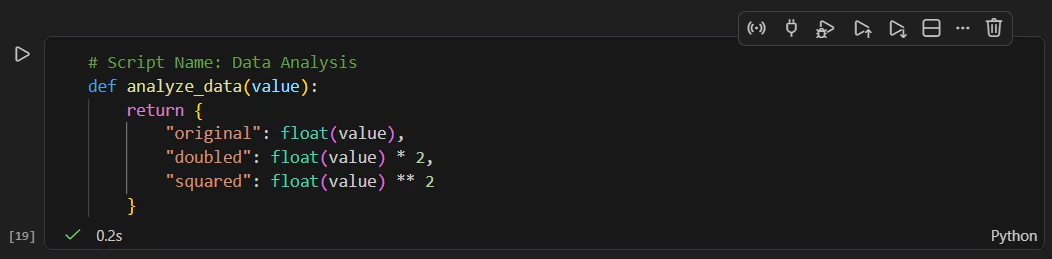 Python cells contain scripts that run inside the broker when called from LoT Actions. The broker's Python runtime executes your functions.
```python wrap theme={"theme":"css-variables","languages":{"custom":["/languages/lot.json"]}}
# Script Name: DataProcessor
def calculate_average(values):
"""Calculate average from a list of numbers"""
if not values:
return 0
return sum(values) / len(values)
def format_alert(sensor_id, value, threshold):
"""Generate formatted alert message"""
return f"ALERT: Sensor {sensor_id} exceeded {threshold} with value {value}"
```
Python scripts require a specific format with `# Script Name: YourScriptName` as the first line. Without this header, the script won't be recognized.
***
## Running LoT
Python cells contain scripts that run inside the broker when called from LoT Actions. The broker's Python runtime executes your functions.
```python wrap theme={"theme":"css-variables","languages":{"custom":["/languages/lot.json"]}}
# Script Name: DataProcessor
def calculate_average(values):
"""Calculate average from a list of numbers"""
if not values:
return 0
return sum(values) / len(values)
def format_alert(sensor_id, value, threshold):
"""Generate formatted alert message"""
return f"ALERT: Sensor {sensor_id} exceeded {threshold} with value {value}"
```
Python scripts require a specific format with `# Script Name: YourScriptName` as the first line. Without this header, the script won't be recognized.
***
## Running LoT
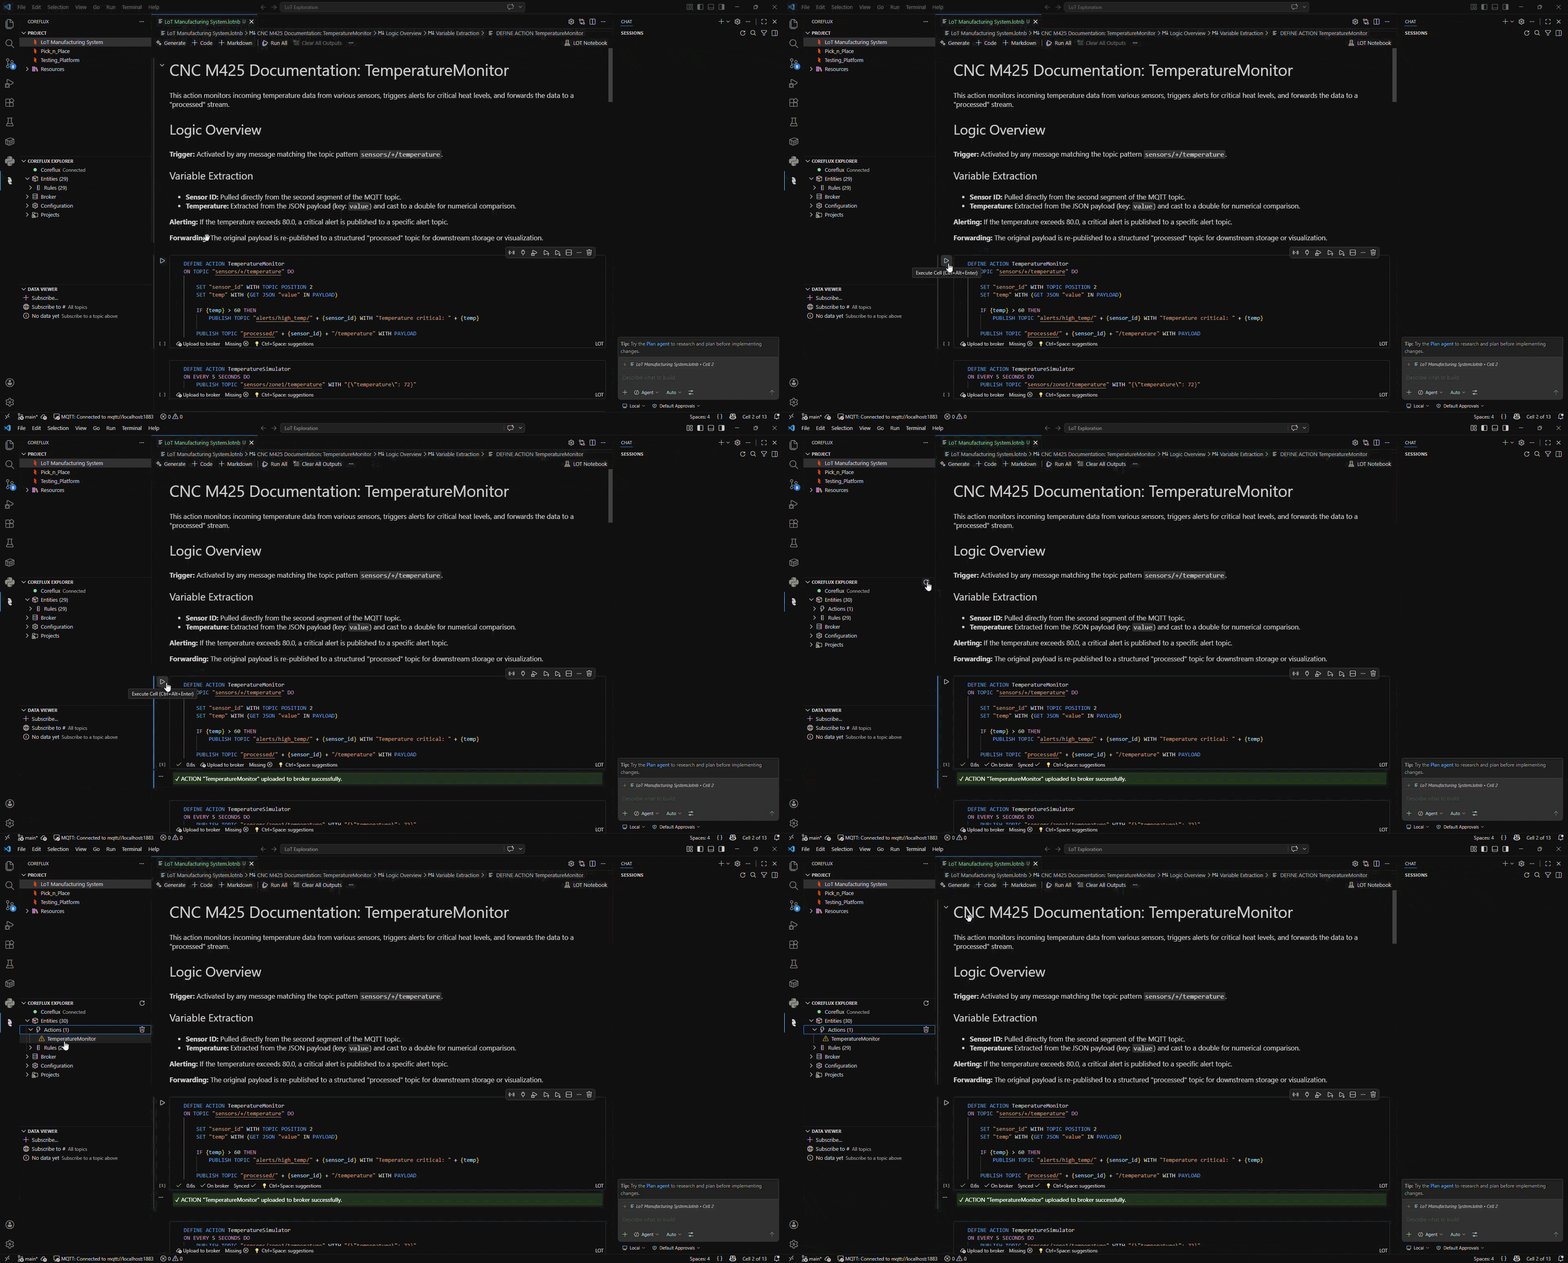 When you click the **Run** button on a cell, the Extension builds your code, checks for errors and deploys to the broker.
If successful, a simple Green response will appear. If any error is found, the code is not deployed and a error message will appear with the error details.
***
## What else you can do with the LoT extension
When you click the **Run** button on a cell, the Extension builds your code, checks for errors and deploys to the broker.
If successful, a simple Green response will appear. If any error is found, the code is not deployed and a error message will appear with the error details.
***
## What else you can do with the LoT extension
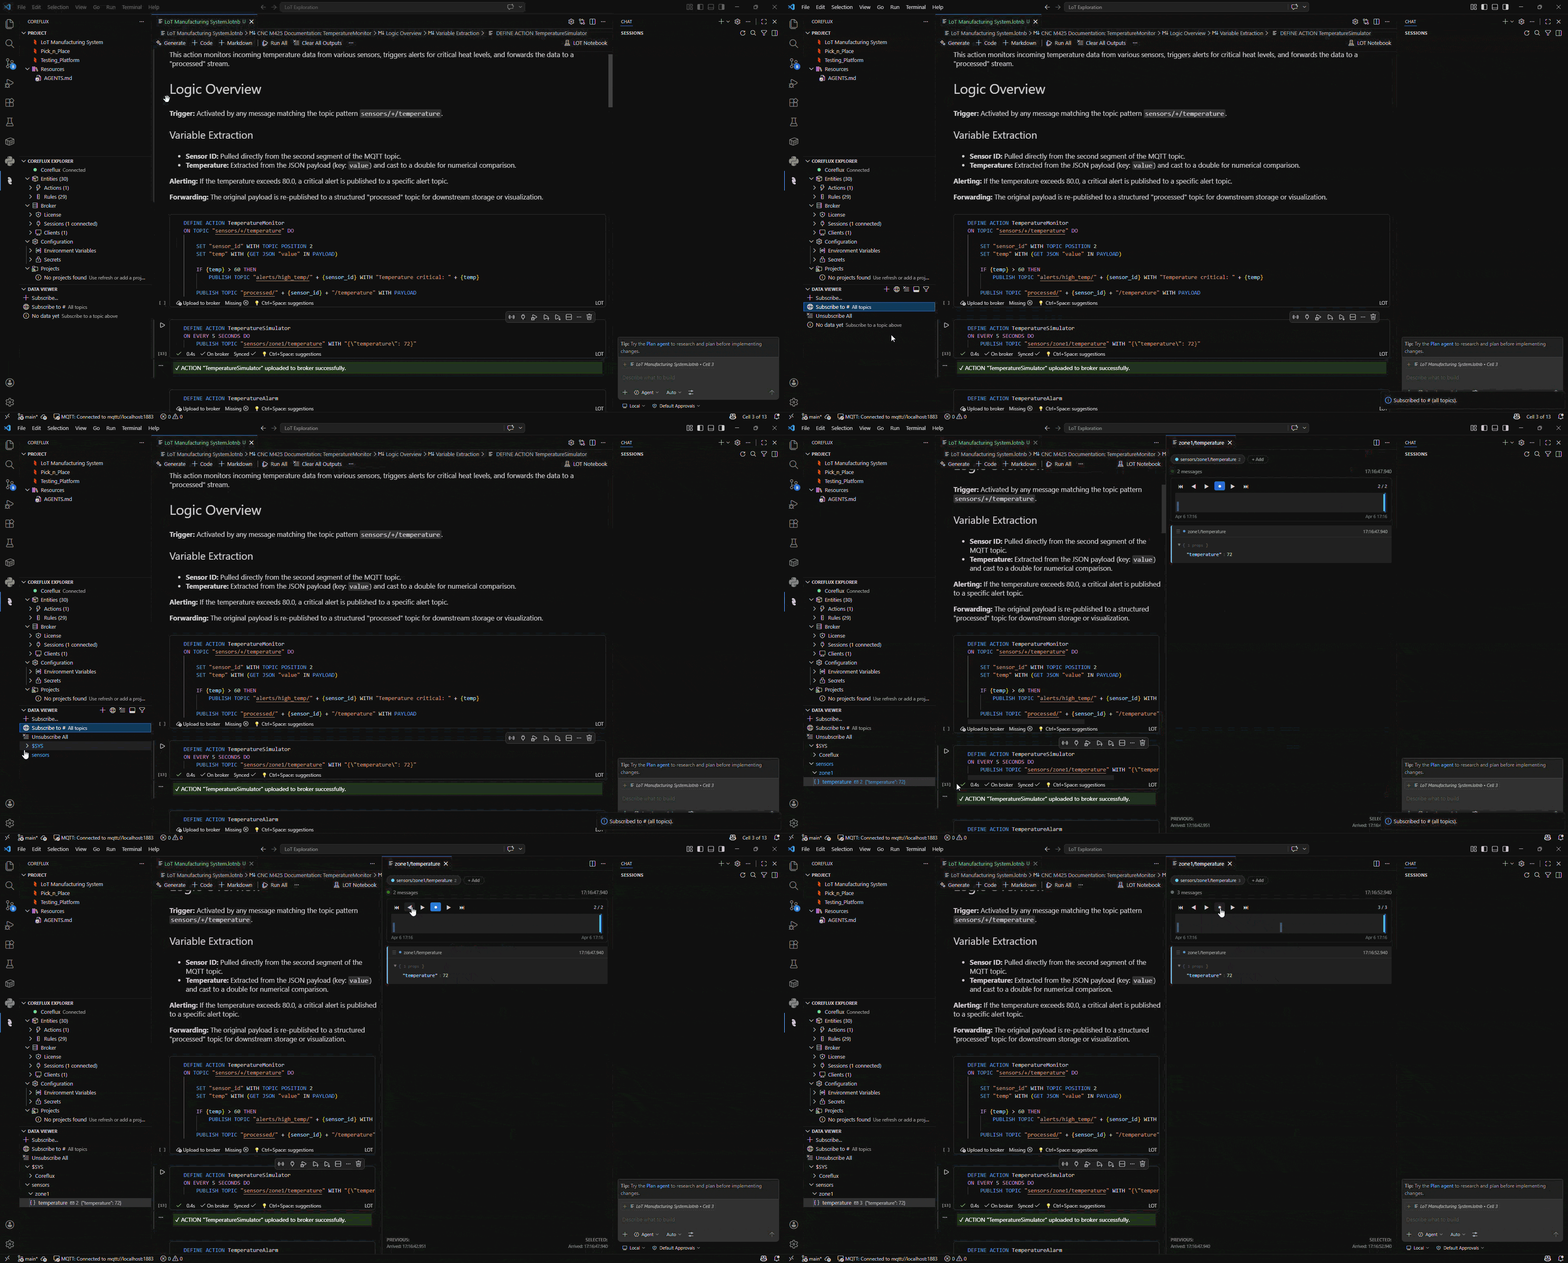 Use the **Coreflux** view (Activity Bar) for broker connection, entities, secrets, license, clients, and live MQTT—without a separate client for most tasks.
| Capability | Why it helps |
| ------------------------------------- | ------------------------------------------------------------------------------------------- |
| **See what is running in the Broker** | See what Actions, Models, Routes, and Rules the broker actually has after a deploy. |
| **Remove LoT code** | On Coreflux Explorer, remove one or more LoT entities. |
| **Manage secrets and env vars** | Configure the secrets within the broker, to manage secure credentials |
| **See license usage** | Spot **license limits** when deploy fails—before you debug LoT as a syntax issue. |
| **See connected clients** | See who is connected; useful when a device or app should be online but is not. |
| **MQTT Data Viewer** | Live topics and payloads in the Data Viewer. |
| **Execution Trace** | For a LoT cell, see it's execution history and which topics and variables that run touched. |
For more on the Data Viewer, replay, formatters, and trace, see [How to Debug in LoT Notebooks](./debug).
### Develop LoT Notebooks with AI
Use the **Coreflux** view (Activity Bar) for broker connection, entities, secrets, license, clients, and live MQTT—without a separate client for most tasks.
| Capability | Why it helps |
| ------------------------------------- | ------------------------------------------------------------------------------------------- |
| **See what is running in the Broker** | See what Actions, Models, Routes, and Rules the broker actually has after a deploy. |
| **Remove LoT code** | On Coreflux Explorer, remove one or more LoT entities. |
| **Manage secrets and env vars** | Configure the secrets within the broker, to manage secure credentials |
| **See license usage** | Spot **license limits** when deploy fails—before you debug LoT as a syntax issue. |
| **See connected clients** | See who is connected; useful when a device or app should be online but is not. |
| **MQTT Data Viewer** | Live topics and payloads in the Data Viewer. |
| **Execution Trace** | For a LoT cell, see it's execution history and which topics and variables that run touched. |
For more on the Data Viewer, replay, formatters, and trace, see [How to Debug in LoT Notebooks](./debug).
### Develop LoT Notebooks with AI
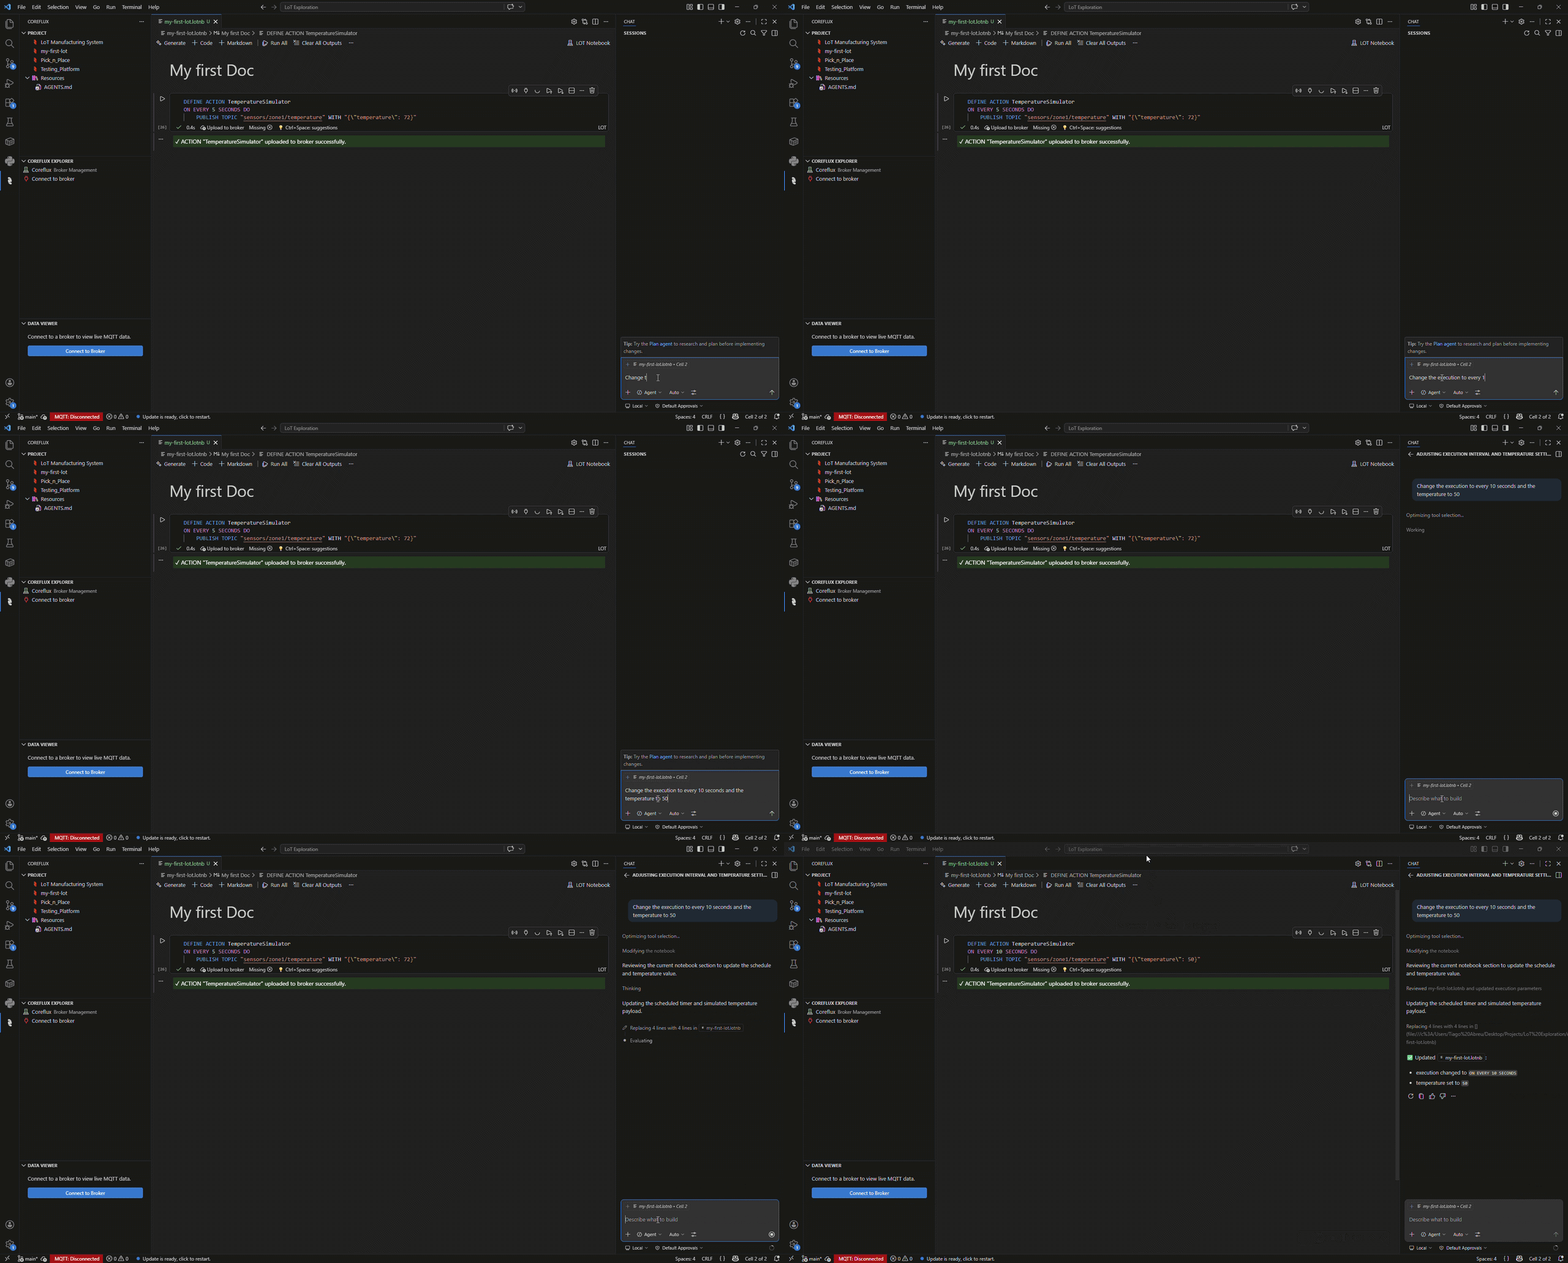 Alongside the extension, you can develop with AI using **Copilot**, just like any programming language. For better results, you can add the **Coreflux MCP** server to the agent, so it can read official docs, and add **AGENTS.md** file for LoT coding practices, so it works like a LoT expert.
To for more details on how to use AI with LoT, check this page: [Developing with LoT Using AI](/ai/developing-with-lot).
### Version control with Git
Alongside the extension, you can develop with AI using **Copilot**, just like any programming language. For better results, you can add the **Coreflux MCP** server to the agent, so it can read official docs, and add **AGENTS.md** file for LoT coding practices, so it works like a LoT expert.
To for more details on how to use AI with LoT, check this page: [Developing with LoT Using AI](/ai/developing-with-lot).
### Version control with Git
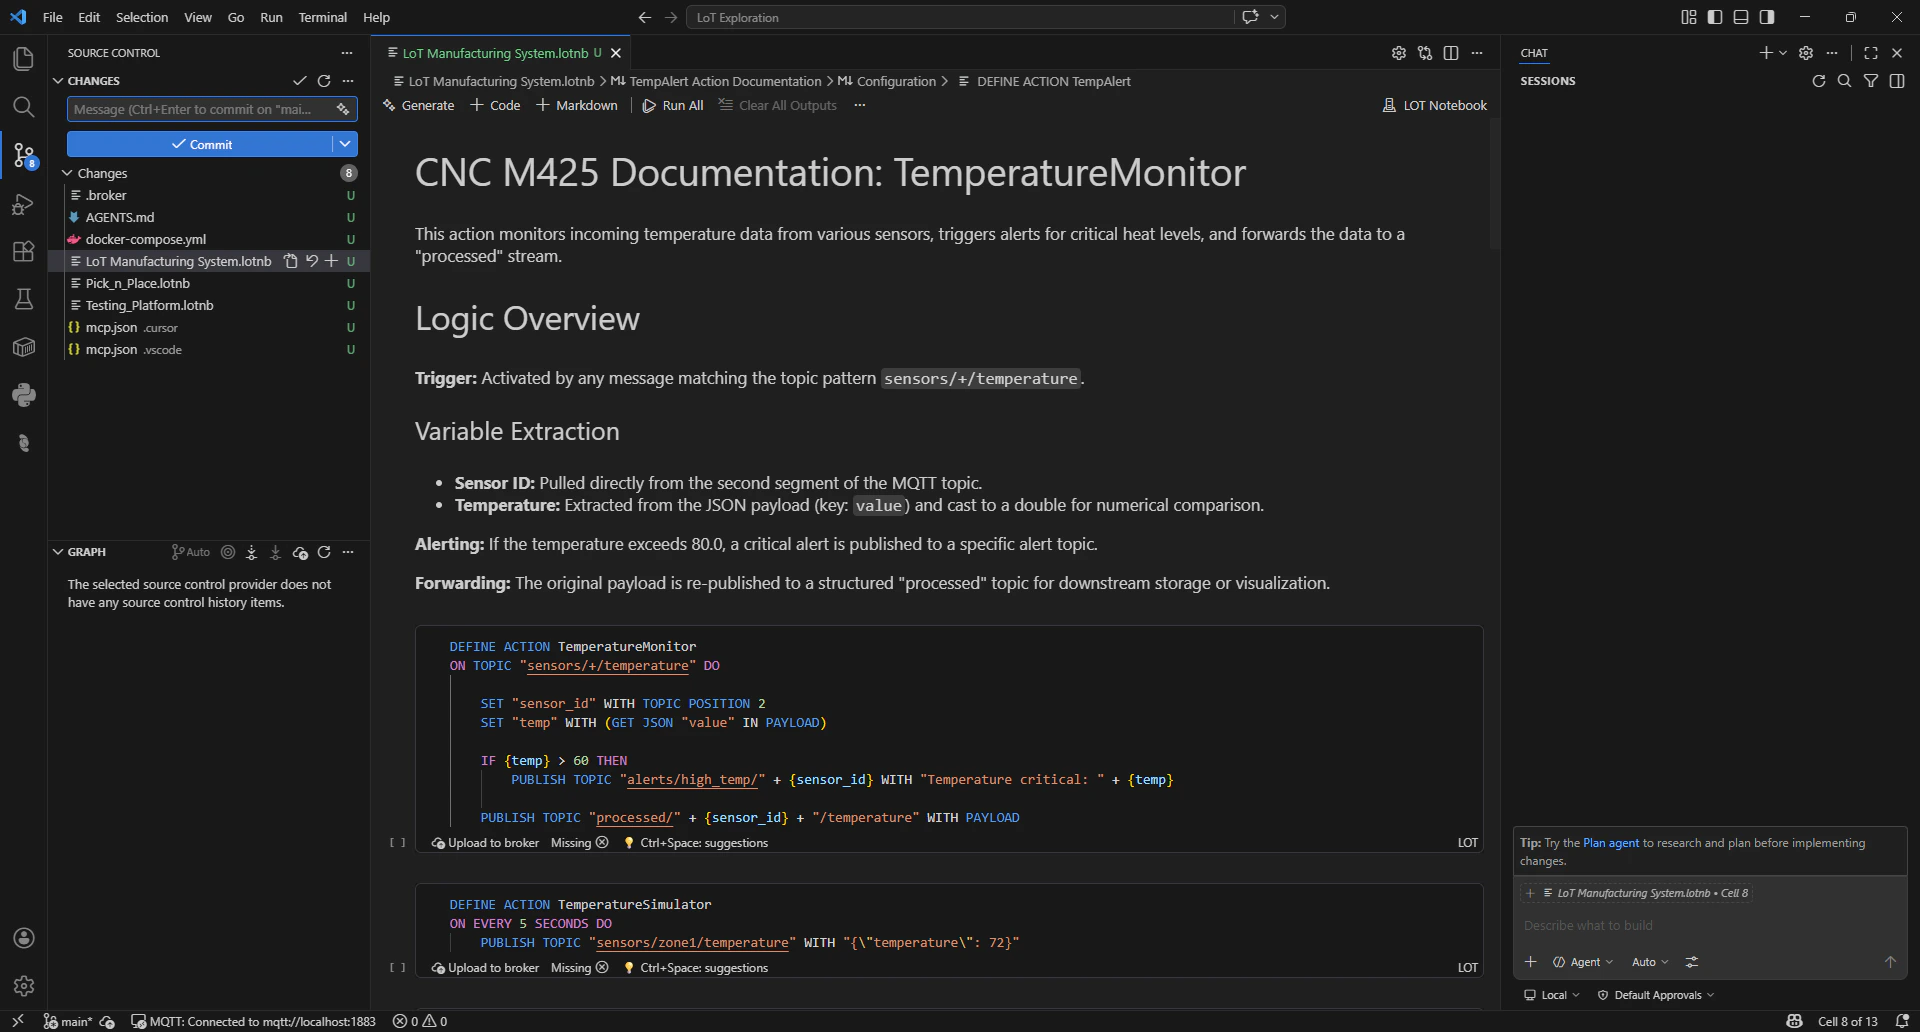 Use **Git** on your **workspace folder** like any project: commit **`.lotnb`** files aswell as any other files, like documentation, Docker files and supporting files.
***
## Best Practices
Use markdown cells liberally to explain your code. Future you (and teammates) will appreciate the context.
Keep each Action, Model, or Route in its own cell. This makes debugging easier and allows selective execution.
Run cells one at a time when developing. This helps isolate issues and understand system behavior.
Name your Actions, Models, and Routes clearly. They appear in the broker's entity lists and should be self-explanatory.
***
## Troubleshooting
* Check that you're connected to the broker (look for connection status in status bar)
* Verify your credentials are correct
* Ensure the broker is running and accessible
If running a cell shows an **error** and the broker rejects the definition because you have reached a **license limit** (for example on actions, routes, or another licensed resource), deployment stops and the message under the cell should describe the limit.
Open the **Coreflux** view in the Activity Bar and check the **Coreflux Explorer** section for your **license** status and usage so you can see what is capped and plan next steps (reduce definitions or adjust your license).
* Confirm the first line is `# Script Name: YourScriptName`
* Check for syntax errors in the Python code
* Ensure function names match what you're calling from LoT
* Check the output for error messages
* Verify no syntax errors in your LoT code
* Use the Coreflux Entities panel to refresh the list
***
## Next Steps
Use cell output, Coreflux Entities, and live MQTT values to fix issues.
Work through hands-on notebooks covering Actions, Models, Routes, and Python.
See what shipped in each VS Code extension release.
Use **Git** on your **workspace folder** like any project: commit **`.lotnb`** files aswell as any other files, like documentation, Docker files and supporting files.
***
## Best Practices
Use markdown cells liberally to explain your code. Future you (and teammates) will appreciate the context.
Keep each Action, Model, or Route in its own cell. This makes debugging easier and allows selective execution.
Run cells one at a time when developing. This helps isolate issues and understand system behavior.
Name your Actions, Models, and Routes clearly. They appear in the broker's entity lists and should be self-explanatory.
***
## Troubleshooting
* Check that you're connected to the broker (look for connection status in status bar)
* Verify your credentials are correct
* Ensure the broker is running and accessible
If running a cell shows an **error** and the broker rejects the definition because you have reached a **license limit** (for example on actions, routes, or another licensed resource), deployment stops and the message under the cell should describe the limit.
Open the **Coreflux** view in the Activity Bar and check the **Coreflux Explorer** section for your **license** status and usage so you can see what is capped and plan next steps (reduce definitions or adjust your license).
* Confirm the first line is `# Script Name: YourScriptName`
* Check for syntax errors in the Python code
* Ensure function names match what you're calling from LoT
* Check the output for error messages
* Verify no syntax errors in your LoT code
* Use the Coreflux Entities panel to refresh the list
***
## Next Steps
Use cell output, Coreflux Entities, and live MQTT values to fix issues.
Work through hands-on notebooks covering Actions, Models, Routes, and Python.
See what shipped in each VS Code extension release.