> ## Documentation Index
> Fetch the complete documentation index at: https://docs.coreflux.org/llms.txt
> Use this file to discover all available pages before exploring further.
# Installation
> Get a Coreflux broker running in minutes — one Docker command, a free Cloud Trial, or native installs for Windows, Linux, and Raspberry Pi.
## Don't want to read? Start here
If you already have [Docker](https://docs.docker.com/get-started/get-docker/) installed, this single command pulls and runs Coreflux locally—broker, LoT runtime, and [Coreflux HUB](/latest/coreflux-hub/overview) included:
```bash wrap theme={"theme":"css-variables","languages":{"custom":["/languages/lot.json"]}}
docker run --pull=always -d --name coreflux_broker -p 1883:1883 -p 5000:5000 -p 8080:8080 -p 8443:8443 -v project-volume:/etc/project coreflux/coreflux-mqtt-broker:latest
```
Every local install method (Docker, Windows, Linux, Raspberry Pi, DigitalOcean) uses the same defaults:
| Setting | Value |
| -------- | ---------- |
| Username | `root` |
| Password | `coreflux` |
For a **Cloud Trial**, use the credentials from your email instead.
That's the whole install. Open the HUB at `http://localhost:8080` and you're running.
**Coreflux runs as a single install.** No separate installers, no databases, no message queues, no orchestration needed—just download and run.
Want the details, other platforms, or a no-install option? Keep reading.
***
## Install Coreflux
Most people should use **Docker** (below). Just evaluating with nothing to install? Use the **Cloud Trial** tab. Specific hardware or production targets are in the remaining tabs.
**\~2 min** if Docker is already installed — broker running locally.
Pull and run the broker (Docker fetches the latest image automatically):
```bash wrap theme={"theme":"css-variables","languages":{"custom":["/languages/lot.json"]}}
docker run --pull=always -d --name coreflux_broker -p 1883:1883 -p 5000:5000 -p 8080:8080 -p 8443:8443 -v project-volume:/etc/project coreflux/coreflux-mqtt-broker:latest
```
**What is Docker?** Docker runs Coreflux inside a self-contained container, so you don't install runtimes or dependencies on your machine by hand—everything the broker needs ships in the image. You only need Docker itself installed first. Get it from the [official Docker install page](https://docs.docker.com/get-started/get-docker/), then confirm it's working before you run the broker:
```bash wrap theme={"theme":"css-variables","languages":{"custom":["/languages/lot.json"]}}
docker --version
```
Once Docker reports a version, pull and run the broker. Docker fetches the latest image automatically (you can also browse it on [Docker Hub](https://hub.docker.com/r/coreflux/coreflux-mqtt-broker)):
```bash wrap theme={"theme":"css-variables","languages":{"custom":["/languages/lot.json"]}}
docker run --pull=always -d --name coreflux_broker -p 1883:1883 -p 5000:5000 -p 8080:8080 -p 8443:8443 -v project-volume:/etc/project coreflux/coreflux-mqtt-broker:latest
```
| Port | Protocol | Description |
| ------ | --------- | ----------------------------------------------------------- |
| `1883` | TCP | MQTT (unencrypted) |
| `5000` | WebSocket | WebSocket connections |
| `8080` | HTTP | [Coreflux HUB](/latest/coreflux-hub/overview) (unencrypted) |
| `8443` | HTTPS | [Coreflux HUB](/latest/coreflux-hub/overview) (TLS) |
Open the HUB at `http://localhost:8080` (or `https://localhost:8443` with TLS) after the container starts.
That's it—Coreflux is now running locally and ready to use. Confirm it works under [Verify Installation](#verify-installation) below.
Breaking the command down piece by piece:
* `--pull=always` — always fetch the latest broker image before starting, so you never run a stale version.
* `-d` — runs the container **detached** (in the background), so your terminal stays free.
* `--name coreflux_broker` — names the container `coreflux_broker` so you can reference it later (for example `docker logs coreflux_broker`).
* `-p 1883:1883 -p 5000:5000 -p 8080:8080 -p 8443:8443` — each `-p host:container` maps a port on your machine to the same port inside the container. See the port table above for what each one is for.
* `-v project-volume:/etc/project` — mounts a named volume so your project (LoT, routes, configuration) persists across restarts and image updates. The mount persists your broker project at `/etc/project` across container restarts, and Docker creates the named volume on first run.
* `coreflux/coreflux-mqtt-broker:latest` — the image to run, pulled from Docker Hub.
If you configure TLS certificates, expose these additional ports:
```bash wrap theme={"theme":"css-variables","languages":{"custom":["/languages/lot.json"]}}
docker run --pull=always -d --name coreflux_broker -p 1883:1883 -p 5000:5000 -p 8080:8080 -p 8443:8443 -p 8883:8883 -p 443:443 -v project-volume:/etc/project coreflux/coreflux-mqtt-broker:latest
```
| Port | Protocol | Description |
| ------ | -------- | ------------------ |
| `8883` | TCP/TLS | MQTT over TLS |
| `443` | WSS | WebSocket over TLS |
See [Broker Configuration](/latest/mqtt-broker/configuration) for TLS setup.
**\~5 min**, nothing to install — hosted broker and HUB in your browser.
Get a hosted Coreflux instance without installing anything. Request a trial on the [Coreflux website](https://www.coreflux.org/), and you will receive an email with a **URL** (used for both the [Coreflux HUB](/latest/coreflux-hub/overview) and the MQTT broker) and **login credentials**.
Go to [coreflux.org](https://www.coreflux.org/) and submit a trial request using the form on the site.
When your environment is ready, Coreflux sends an email with:
| Item | What you use it for |
| --------------- | ------------------------------------------------------------------------------------------------------------- |
| **URL** | Open the HUB in your browser and connect MQTT clients to the **same host** (broker and HUB share one address) |
| **Credentials** | Username and password for the HUB login screen and for MQTT clients |
The broker may take **up to 60 seconds** to be fully available after you receive the email. If the HUB or MQTT connection fails immediately, wait briefly and try again.
Paste the URL from the email into your browser. On the login page, enter your username and password and click **Connect to Coreflux**. Use the **Broker** field from the email if it is pre-filled differently than your trial URL.
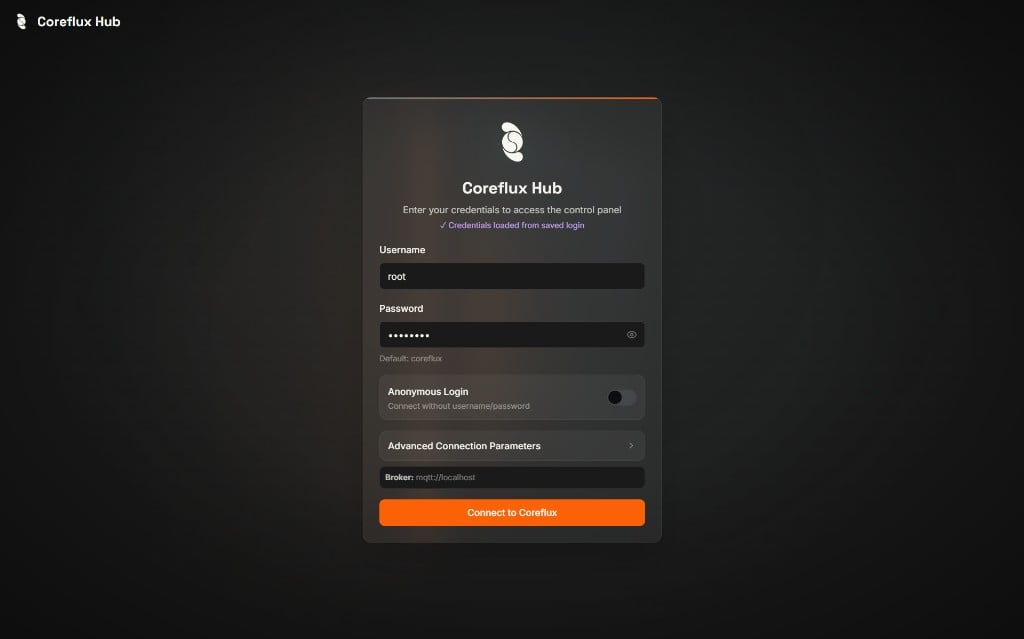 From the HUB you can deploy LoT Actions, browse MQTT topics in the Data Viewer, and manage Routes—same experience as a local Docker install.
Use the **same host** as the URL in your email (not `localhost`). For MQTT Explorer and other desktop clients:
| Setting | Value |
| ------------------- | ------------------------- |
| Protocol | **MQTTS** (MQTT over TLS) |
| Port | **8883** |
| Username / Password | From your trial email |
In **MQTT Explorer** specifically: enable **Encryption**, and **disable Validate certificate** (the trial broker uses a certificate that desktop tools may not trust by default).
That's it—your trial is live and ready to use, with the broker and HUB already running on the URL from your email.
**HUB remote access:** If your browser blocks the HUB page, allow **unsecure access** (or proceed past the certificate warning) for the trial URL. Managed trial environments often use certificates that browsers flag on first visit.
After the HUB loads, continue with [Getting Started](/latest/quick-start/getting-started) using the **Coreflux HUB** tabs—your trial already includes the HUB and broker.
**\~10 min** (plus a DigitalOcean account) — production-ready broker running in the cloud.
Deploy Coreflux in seconds with our **1-Click Droplet** on DigitalOcean Marketplace. This is the fastest way to get a production-ready broker running in the cloud.
From the HUB you can deploy LoT Actions, browse MQTT topics in the Data Viewer, and manage Routes—same experience as a local Docker install.
Use the **same host** as the URL in your email (not `localhost`). For MQTT Explorer and other desktop clients:
| Setting | Value |
| ------------------- | ------------------------- |
| Protocol | **MQTTS** (MQTT over TLS) |
| Port | **8883** |
| Username / Password | From your trial email |
In **MQTT Explorer** specifically: enable **Encryption**, and **disable Validate certificate** (the trial broker uses a certificate that desktop tools may not trust by default).
That's it—your trial is live and ready to use, with the broker and HUB already running on the URL from your email.
**HUB remote access:** If your browser blocks the HUB page, allow **unsecure access** (or proceed past the certificate warning) for the trial URL. Managed trial environments often use certificates that browsers flag on first visit.
After the HUB loads, continue with [Getting Started](/latest/quick-start/getting-started) using the **Coreflux HUB** tabs—your trial already includes the HUB and broker.
**\~10 min** (plus a DigitalOcean account) — production-ready broker running in the cloud.
Deploy Coreflux in seconds with our **1-Click Droplet** on DigitalOcean Marketplace. This is the fastest way to get a production-ready broker running in the cloud.
 Click the button above or visit the [Coreflux Marketplace page](https://marketplace.digitalocean.com/apps/coreflux-mqtt-broker?refcode=b993040d0243\&action=deploy).
Select a plan based on your needs:
| Plan | RAM | vCPUs | Best For |
| --------- | -------- | ----- | -------------------- |
| Basic | 1 GB | 1 | Development, testing |
| Basic | 2 GB | 1 | Small deployments |
| **Basic** | **4 GB** | **2** | **Recommended** ✓ |
We recommend the **4 GB / 2 vCPU** droplet for most use cases. It provides headroom for LoT Actions, multiple routes, and moderate message throughput.
Choose a datacenter close to your devices for lower latency.
Click **Create Droplet** and wait \~60 seconds for deployment.
Once the droplet is ready, use the public IP address to connect:
| Setting | Value |
| -------- | ------------------- |
| Host | `` |
| Port | `1883` |
| Username | `root` |
| Password | `coreflux` |
That's it—your droplet is now running Coreflux and ready to use.
Change the default password immediately after first login. SSH into your droplet and update the broker configuration.
The Coreflux droplet exposes the following ports by default:
| Port | Protocol | Description |
| ------ | --------- | --------------------- |
| `1883` | TCP | MQTT (unencrypted) |
| `8883` | TCP/TLS | MQTT over TLS |
| `5000` | WebSocket | WebSocket connections |
| `443` | WSS | WebSocket over TLS |
Configure your DigitalOcean firewall to restrict access as needed.
To manage your Coreflux installation via SSH:
```bash wrap theme={"theme":"css-variables","languages":{"custom":["/languages/lot.json"]}}
ssh root@
```
The Coreflux broker runs as a systemd service. Common commands:
```bash wrap theme={"theme":"css-variables","languages":{"custom":["/languages/lot.json"]}}
# Check status
sudo systemctl status coreflux
# Restart broker
sudo systemctl restart coreflux
# View logs
sudo journalctl -u coreflux -f
```
**\~10 min** — broker running as a Windows service.
Download and install Coreflux, then register it as a Windows service using the native `sc` tool.
1. Download the Windows zip from [coreflux.org > Start Free](https://www.coreflux.org)
2. Extract the zip file to your preferred location (e.g., `C:\Coreflux`)
3. Open Command Prompt **as Administrator** and run:
```cmd wrap theme={"theme":"css-variables","languages":{"custom":["/languages/lot.json"]}}
sc create CorefluxBroker binPath= "C:\Coreflux\CorefluxMQTTBroker.exe" start= auto DisplayName= "Coreflux MQTT Broker"
sc description CorefluxBroker "Coreflux MQTT Broker Service"
sc start CorefluxBroker
```
That's it—the service is now registered, set to start automatically on boot, and running, so Coreflux is ready to use.
Use these native Windows commands to control the service:
```cmd wrap theme={"theme":"css-variables","languages":{"custom":["/languages/lot.json"]}}
sc stop CorefluxBroker
sc start CorefluxBroker
sc query CorefluxBroker
```
You can also manage it from **Services** (`services.msc`) in Windows.
Stop and remove the service with:
```cmd wrap theme={"theme":"css-variables","languages":{"custom":["/languages/lot.json"]}}
sc stop CorefluxBroker
sc delete CorefluxBroker
```
**\~10 min** — broker running locally or as a systemd service.
Download and run the Coreflux binary on Linux x64 systems.
**Quick Start (foreground):**
1. Download the Linux zip from [coreflux.org > Start Free](https://www.coreflux.org)
2. Extract and run (replace `` with your actual filename):
```bash wrap theme={"theme":"css-variables","languages":{"custom":["/languages/lot.json"]}}
unzip .zip -d coreflux
cd coreflux
chmod +x CorefluxMQTTBroker
./CorefluxMQTTBroker
```
**Production Setup (systemd service):**
1. Create a service file:
```bash wrap theme={"theme":"css-variables","languages":{"custom":["/languages/lot.json"]}}
sudo nano /etc/systemd/system/coreflux.service
```
2. Add this configuration (adjust paths as needed):
```ini wrap theme={"theme":"css-variables","languages":{"custom":["/languages/lot.json"]}}
[Unit]
Description=Coreflux MQTT Broker
After=network.target
[Service]
Type=simple
User=root
WorkingDirectory=/opt/coreflux
ExecStart=/opt/coreflux/CorefluxMQTTBroker
Restart=always
RestartSec=5
[Install]
WantedBy=multi-user.target
```
3. Enable and start the service:
```bash wrap theme={"theme":"css-variables","languages":{"custom":["/languages/lot.json"]}}
sudo systemctl daemon-reload
sudo systemctl enable coreflux
sudo systemctl start coreflux
```
4. Check the status:
```bash wrap theme={"theme":"css-variables","languages":{"custom":["/languages/lot.json"]}}
sudo systemctl status coreflux
```
A status of **active (running)** means Coreflux is up and ready to use.
**\~10 min** — broker running on your Raspberry Pi.
Download and run the Coreflux binary on Raspberry Pi (64-bit ARM).
**Quick Start (foreground):**
1. Download the Raspberry Pi zip from [coreflux.org > Start Free](https://www.coreflux.org)
2. Extract and run (replace `` with your actual filename):
```bash wrap theme={"theme":"css-variables","languages":{"custom":["/languages/lot.json"]}}
unzip .zip -d coreflux
cd coreflux
chmod +x CorefluxMQTTBroker
./CorefluxMQTTBroker
```
**Production Setup (systemd service):**
1. Create a service file:
```bash wrap theme={"theme":"css-variables","languages":{"custom":["/languages/lot.json"]}}
sudo nano /etc/systemd/system/coreflux.service
```
2. Add this configuration:
```ini wrap theme={"theme":"css-variables","languages":{"custom":["/languages/lot.json"]}}
[Unit]
Description=Coreflux MQTT Broker
After=network.target
[Service]
Type=simple
User=root
WorkingDirectory=/home/pi/coreflux
ExecStart=/home/pi/coreflux/CorefluxMQTTBroker
Restart=always
RestartSec=5
[Install]
WantedBy=multi-user.target
```
3. Enable and start the service:
```bash wrap theme={"theme":"css-variables","languages":{"custom":["/languages/lot.json"]}}
sudo systemctl daemon-reload
sudo systemctl enable coreflux
sudo systemctl start coreflux
```
4. Check the status:
```bash wrap theme={"theme":"css-variables","languages":{"custom":["/languages/lot.json"]}}
sudo systemctl status coreflux
```
A status of **active (running)** means Coreflux is up and ready to use on your Raspberry Pi.
***
## Using the Coreflux HUB
The Coreflux HUB is available in two ways: via the Docker image (browser-based, no extra install) or as a standalone desktop application for Windows and Linux, available on [Coreflux.org](https://www.coreflux.org).
Nothing extra to do—the HUB is **already included** when you run the Docker install command above, because it maps ports `8080` (HTTP) and `8443` (HTTPS). Open it at `http://localhost:8080` (or `https://localhost:8443` with TLS). See the [Coreflux HUB Overview](/latest/coreflux-hub/overview) for what you can do once it's up.
If the HUB ports are not mapped on Docker, the broker still runs normally—you simply won't be able to open the HUB in the browser. See [Coreflux HUB Overview](/latest/coreflux-hub/overview) for what you can do once it's up.
The standalone HUB is a desktop application available for **Windows x64**, **Linux x64**, and **Linux ARM64**. It does not require a broker installation on the same machine.
1. Download the HUB executable for your platform from [coreflux.org](https://www.coreflux.org).
2. Run the executable — the HUB window opens immediately.
3. Connect to your Coreflux broker from inside the app using the broker's host address and credentials.
***
## Verify Installation
The quickest visual check is the [Coreflux HUB](/latest/coreflux-hub/overview) in your browser. You can also confirm directly by connecting an MQTT client and seeing Coreflux's system topics—that's how the broker is actually used. Use the [default credentials](#dont-want-to-read-start-here) from the top of the page (or your trial email).
Open your environment URL in the browser—for a **Cloud Trial**, use the address from your email; for Docker, use `http://localhost:8080` (or `https://localhost:8443` with TLS).
Enter your credentials (the defaults above) on the login page and click **Connect to Coreflux**.
After a successful login, you should see the HUB home screen with the bottom navigation bar.
Click the button above or visit the [Coreflux Marketplace page](https://marketplace.digitalocean.com/apps/coreflux-mqtt-broker?refcode=b993040d0243\&action=deploy).
Select a plan based on your needs:
| Plan | RAM | vCPUs | Best For |
| --------- | -------- | ----- | -------------------- |
| Basic | 1 GB | 1 | Development, testing |
| Basic | 2 GB | 1 | Small deployments |
| **Basic** | **4 GB** | **2** | **Recommended** ✓ |
We recommend the **4 GB / 2 vCPU** droplet for most use cases. It provides headroom for LoT Actions, multiple routes, and moderate message throughput.
Choose a datacenter close to your devices for lower latency.
Click **Create Droplet** and wait \~60 seconds for deployment.
Once the droplet is ready, use the public IP address to connect:
| Setting | Value |
| -------- | ------------------- |
| Host | `` |
| Port | `1883` |
| Username | `root` |
| Password | `coreflux` |
That's it—your droplet is now running Coreflux and ready to use.
Change the default password immediately after first login. SSH into your droplet and update the broker configuration.
The Coreflux droplet exposes the following ports by default:
| Port | Protocol | Description |
| ------ | --------- | --------------------- |
| `1883` | TCP | MQTT (unencrypted) |
| `8883` | TCP/TLS | MQTT over TLS |
| `5000` | WebSocket | WebSocket connections |
| `443` | WSS | WebSocket over TLS |
Configure your DigitalOcean firewall to restrict access as needed.
To manage your Coreflux installation via SSH:
```bash wrap theme={"theme":"css-variables","languages":{"custom":["/languages/lot.json"]}}
ssh root@
```
The Coreflux broker runs as a systemd service. Common commands:
```bash wrap theme={"theme":"css-variables","languages":{"custom":["/languages/lot.json"]}}
# Check status
sudo systemctl status coreflux
# Restart broker
sudo systemctl restart coreflux
# View logs
sudo journalctl -u coreflux -f
```
**\~10 min** — broker running as a Windows service.
Download and install Coreflux, then register it as a Windows service using the native `sc` tool.
1. Download the Windows zip from [coreflux.org > Start Free](https://www.coreflux.org)
2. Extract the zip file to your preferred location (e.g., `C:\Coreflux`)
3. Open Command Prompt **as Administrator** and run:
```cmd wrap theme={"theme":"css-variables","languages":{"custom":["/languages/lot.json"]}}
sc create CorefluxBroker binPath= "C:\Coreflux\CorefluxMQTTBroker.exe" start= auto DisplayName= "Coreflux MQTT Broker"
sc description CorefluxBroker "Coreflux MQTT Broker Service"
sc start CorefluxBroker
```
That's it—the service is now registered, set to start automatically on boot, and running, so Coreflux is ready to use.
Use these native Windows commands to control the service:
```cmd wrap theme={"theme":"css-variables","languages":{"custom":["/languages/lot.json"]}}
sc stop CorefluxBroker
sc start CorefluxBroker
sc query CorefluxBroker
```
You can also manage it from **Services** (`services.msc`) in Windows.
Stop and remove the service with:
```cmd wrap theme={"theme":"css-variables","languages":{"custom":["/languages/lot.json"]}}
sc stop CorefluxBroker
sc delete CorefluxBroker
```
**\~10 min** — broker running locally or as a systemd service.
Download and run the Coreflux binary on Linux x64 systems.
**Quick Start (foreground):**
1. Download the Linux zip from [coreflux.org > Start Free](https://www.coreflux.org)
2. Extract and run (replace `` with your actual filename):
```bash wrap theme={"theme":"css-variables","languages":{"custom":["/languages/lot.json"]}}
unzip .zip -d coreflux
cd coreflux
chmod +x CorefluxMQTTBroker
./CorefluxMQTTBroker
```
**Production Setup (systemd service):**
1. Create a service file:
```bash wrap theme={"theme":"css-variables","languages":{"custom":["/languages/lot.json"]}}
sudo nano /etc/systemd/system/coreflux.service
```
2. Add this configuration (adjust paths as needed):
```ini wrap theme={"theme":"css-variables","languages":{"custom":["/languages/lot.json"]}}
[Unit]
Description=Coreflux MQTT Broker
After=network.target
[Service]
Type=simple
User=root
WorkingDirectory=/opt/coreflux
ExecStart=/opt/coreflux/CorefluxMQTTBroker
Restart=always
RestartSec=5
[Install]
WantedBy=multi-user.target
```
3. Enable and start the service:
```bash wrap theme={"theme":"css-variables","languages":{"custom":["/languages/lot.json"]}}
sudo systemctl daemon-reload
sudo systemctl enable coreflux
sudo systemctl start coreflux
```
4. Check the status:
```bash wrap theme={"theme":"css-variables","languages":{"custom":["/languages/lot.json"]}}
sudo systemctl status coreflux
```
A status of **active (running)** means Coreflux is up and ready to use.
**\~10 min** — broker running on your Raspberry Pi.
Download and run the Coreflux binary on Raspberry Pi (64-bit ARM).
**Quick Start (foreground):**
1. Download the Raspberry Pi zip from [coreflux.org > Start Free](https://www.coreflux.org)
2. Extract and run (replace `` with your actual filename):
```bash wrap theme={"theme":"css-variables","languages":{"custom":["/languages/lot.json"]}}
unzip .zip -d coreflux
cd coreflux
chmod +x CorefluxMQTTBroker
./CorefluxMQTTBroker
```
**Production Setup (systemd service):**
1. Create a service file:
```bash wrap theme={"theme":"css-variables","languages":{"custom":["/languages/lot.json"]}}
sudo nano /etc/systemd/system/coreflux.service
```
2. Add this configuration:
```ini wrap theme={"theme":"css-variables","languages":{"custom":["/languages/lot.json"]}}
[Unit]
Description=Coreflux MQTT Broker
After=network.target
[Service]
Type=simple
User=root
WorkingDirectory=/home/pi/coreflux
ExecStart=/home/pi/coreflux/CorefluxMQTTBroker
Restart=always
RestartSec=5
[Install]
WantedBy=multi-user.target
```
3. Enable and start the service:
```bash wrap theme={"theme":"css-variables","languages":{"custom":["/languages/lot.json"]}}
sudo systemctl daemon-reload
sudo systemctl enable coreflux
sudo systemctl start coreflux
```
4. Check the status:
```bash wrap theme={"theme":"css-variables","languages":{"custom":["/languages/lot.json"]}}
sudo systemctl status coreflux
```
A status of **active (running)** means Coreflux is up and ready to use on your Raspberry Pi.
***
## Using the Coreflux HUB
The Coreflux HUB is available in two ways: via the Docker image (browser-based, no extra install) or as a standalone desktop application for Windows and Linux, available on [Coreflux.org](https://www.coreflux.org).
Nothing extra to do—the HUB is **already included** when you run the Docker install command above, because it maps ports `8080` (HTTP) and `8443` (HTTPS). Open it at `http://localhost:8080` (or `https://localhost:8443` with TLS). See the [Coreflux HUB Overview](/latest/coreflux-hub/overview) for what you can do once it's up.
If the HUB ports are not mapped on Docker, the broker still runs normally—you simply won't be able to open the HUB in the browser. See [Coreflux HUB Overview](/latest/coreflux-hub/overview) for what you can do once it's up.
The standalone HUB is a desktop application available for **Windows x64**, **Linux x64**, and **Linux ARM64**. It does not require a broker installation on the same machine.
1. Download the HUB executable for your platform from [coreflux.org](https://www.coreflux.org).
2. Run the executable — the HUB window opens immediately.
3. Connect to your Coreflux broker from inside the app using the broker's host address and credentials.
***
## Verify Installation
The quickest visual check is the [Coreflux HUB](/latest/coreflux-hub/overview) in your browser. You can also confirm directly by connecting an MQTT client and seeing Coreflux's system topics—that's how the broker is actually used. Use the [default credentials](#dont-want-to-read-start-here) from the top of the page (or your trial email).
Open your environment URL in the browser—for a **Cloud Trial**, use the address from your email; for Docker, use `http://localhost:8080` (or `https://localhost:8443` with TLS).
Enter your credentials (the defaults above) on the login page and click **Connect to Coreflux**.
After a successful login, you should see the HUB home screen with the bottom navigation bar.
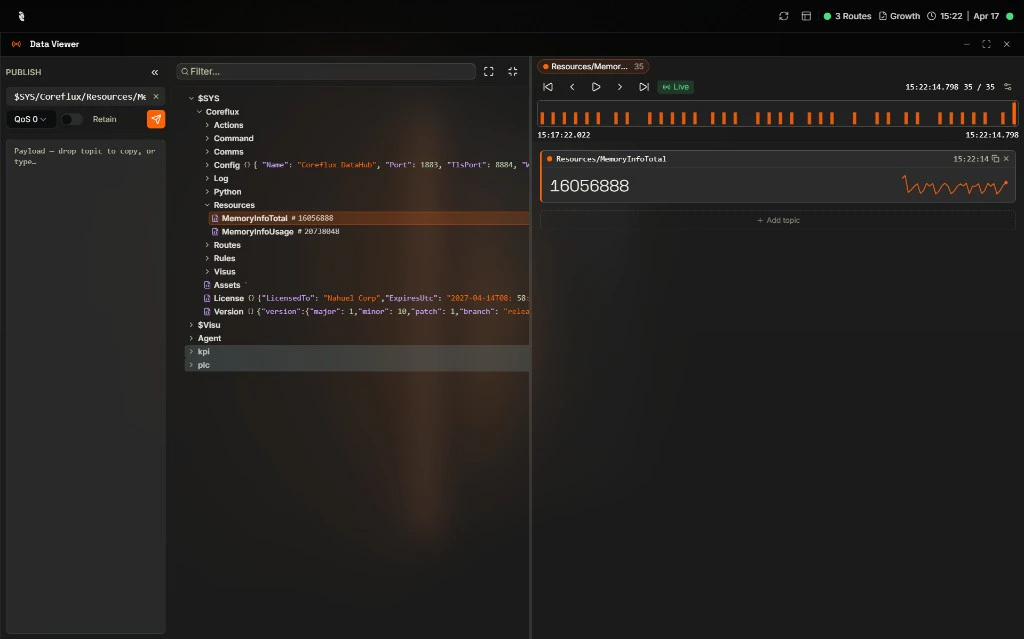
 The status bar shows route count and license info—the broker is reachable from the HUB.
Select **MQTT** → **Data Viewer**. Expand **\$SYS/Coreflux** in the Topic Tree—you should see broker topics such as **Config**, **Version**, and **Resources** updating live.
The status bar shows route count and license info—the broker is reachable from the HUB.
Select **MQTT** → **Data Viewer**. Expand **\$SYS/Coreflux** in the Topic Tree—you should see broker topics such as **Config**, **Version**, and **Resources** updating live.
 Download [MQTT Explorer](https://mqtt-explorer.com/) or use any MQTT client of your choice.
Create a new connection with these settings:
| Setting | Value |
| ------------------- | ---------------------------------------------------------- |
| Host | `localhost` (or your trial URL host for Cloud Trial) |
| Port | `1883` (local Docker) or **8883** with MQTTS (Cloud Trial) |
| Username / Password | The default credentials above |
For **Cloud Trial**, use **MQTTS** on port **8883**, enable **Encryption**, and **disable Validate certificate** in MQTT Explorer.
Subscribe to `$SYS/#` to see broker status messages. If you see topics such as `$SYS/Coreflux/Version`, the broker is running correctly.
You should see Coreflux system topics under `$SYS/Coreflux/`.
### If verification fails
Pick the symptom that matches your setup:
If you can't connect, confirm the broker is actually up using the tooling for your install method.
For a **Docker** install, inspect the container:
```bash wrap theme={"theme":"css-variables","languages":{"custom":["/languages/lot.json"]}}
# Is the container running?
docker ps
# View broker logs (live)
docker logs -f coreflux_broker
# Restart the container
docker restart coreflux_broker
```
For a **service install**, check the service status: `sudo systemctl status coreflux` (Linux, Raspberry Pi, DigitalOcean) or `sc query CorefluxBroker` (Windows).
**Symptom:** the HUB loads in some environments but not in a Docker-in-VM or remote setup.
**Fix:** use the host's actual address instead of `localhost`.
**Symptom:** the command errors with "cannot connect to the Docker daemon".
**Fix:** start Docker Desktop (or the Docker service) and run the command again.
**Symptom:** an error binding a port, e.g. `8080` or `1883` is already allocated.
**Fix:** stop the process using that port, or remap the host side of the port (for example `-p 8081:8080`).
**Symptom:** `docker ps` shows nothing after you start the broker.
**Fix:** run `docker logs coreflux_broker` to see why it exited.
**Symptom:** the HUB or an MQTT client fails to connect right after you receive your trial email.
**Fix:** wait up to **60 seconds** for the broker to become available, then retry. In the browser, allow **unsecure access** (or proceed past the certificate warning) for the trial URL. In MQTT Explorer, use **MQTTS** on port **8883**, enable **Encryption**, and **disable Validate certificate**.
***
## Next Steps
Create your first LoT Action in under 15 minutes.
Set up the LoT language extension for syntax highlighting.
Download [MQTT Explorer](https://mqtt-explorer.com/) or use any MQTT client of your choice.
Create a new connection with these settings:
| Setting | Value |
| ------------------- | ---------------------------------------------------------- |
| Host | `localhost` (or your trial URL host for Cloud Trial) |
| Port | `1883` (local Docker) or **8883** with MQTTS (Cloud Trial) |
| Username / Password | The default credentials above |
For **Cloud Trial**, use **MQTTS** on port **8883**, enable **Encryption**, and **disable Validate certificate** in MQTT Explorer.
Subscribe to `$SYS/#` to see broker status messages. If you see topics such as `$SYS/Coreflux/Version`, the broker is running correctly.
You should see Coreflux system topics under `$SYS/Coreflux/`.
### If verification fails
Pick the symptom that matches your setup:
If you can't connect, confirm the broker is actually up using the tooling for your install method.
For a **Docker** install, inspect the container:
```bash wrap theme={"theme":"css-variables","languages":{"custom":["/languages/lot.json"]}}
# Is the container running?
docker ps
# View broker logs (live)
docker logs -f coreflux_broker
# Restart the container
docker restart coreflux_broker
```
For a **service install**, check the service status: `sudo systemctl status coreflux` (Linux, Raspberry Pi, DigitalOcean) or `sc query CorefluxBroker` (Windows).
**Symptom:** the HUB loads in some environments but not in a Docker-in-VM or remote setup.
**Fix:** use the host's actual address instead of `localhost`.
**Symptom:** the command errors with "cannot connect to the Docker daemon".
**Fix:** start Docker Desktop (or the Docker service) and run the command again.
**Symptom:** an error binding a port, e.g. `8080` or `1883` is already allocated.
**Fix:** stop the process using that port, or remap the host side of the port (for example `-p 8081:8080`).
**Symptom:** `docker ps` shows nothing after you start the broker.
**Fix:** run `docker logs coreflux_broker` to see why it exited.
**Symptom:** the HUB or an MQTT client fails to connect right after you receive your trial email.
**Fix:** wait up to **60 seconds** for the broker to become available, then retry. In the browser, allow **unsecure access** (or proceed past the certificate warning) for the trial URL. In MQTT Explorer, use **MQTTS** on port **8883**, enable **Encryption**, and **disable Validate certificate**.
***
## Next Steps
Create your first LoT Action in under 15 minutes.
Set up the LoT language extension for syntax highlighting.